If you haven’t already done so, please read the FFY Introduction.
Each month, I take you behind-the-scenes of how I run the farm (all while working full time!) I also include topics I *wish* I would have known or done when I was just starting out. There are actionable steps if you want to follow along, as well as exercises and tools that I use (whether industry standards or my own proprietary templates, like my Seed Sowing & Planning Spreadsheet)!
January Overview
Here’s a breakdown of what we’re covering in January:
- Dreaming
- Planning
- Inventory & Ordering
- Sowing
- Business & Taxes
- Social Content
Dream
For me, the winter months are all about dreaming. Before we even begin with January’s planning and tasks, the first thing we need to do is dream and be inspired. I’ve included two of my favorite ways to do this for my business. Please, please, please do not skip them. This is not fluff. I did not need to make this post longer (lol), these are things that have made a difference in my life and business.
And when I say dream, I mean DREAM BIG! There are absolutely zero limits here. If something comes to mind, don’t downplay with thoughts like, “this is amazing, but it could never work for me.” If we limit our dreams, where does that leave our reality?!
Be playful with these and don’t think too seriously about it. Letting your imagination run wild is where the magic is. No one needs to even know about these exercises. Give yourself permission to be wild and free.
Exercise One: Inspiration
The first exercise is simply collecting visuals that speak to you. You can do this in a number of ways: Create an “Inspire” board on Pinterest, an “Inspire” Collection on Instagram, or cut out physical images from magazines and paste them onto a mood board (or all of the above). I prefer the Pinterest and Instagram route. While I like to do this exercise all year, January is a perfect time to give yourself some guilt-free scroll time.
All you need to do is save any image that speaks to you: it doesn’t even need to be flower related. Don’t overthink or analyze this. If you see something you like, for whatever reason, just save it to your “Inspire” board/collection. Resist the urge to review the collection until after a little time has passed.
We’re going to use this for our planning later, but after some time has passed, look through what you’ve collected. What themes do you see? Are there certain colors or patterns that show up consistently? Is what’s in the image straightforward or more of a feeling (I tend to collect a lot of images that “feel” a certain way)? Does anything surprise you? What could you incorporate into your business for the upcoming year?
What this is meant to do: Disrupt thought patters and expand your mind based on what you’re naturally drawn to and inspired by.
What it’s not meant to do: Comparison trap.
If you find yourself comparing yourself to others (we’ve all been there), let me offer this reframe: I think feelings of comparison or envy have this negative connotation to them when they can actually be incredibly powerful and beautiful. I truly believe that whenever we have feelings of comparison or jealousy, it’s because there is something within us that knows what we’re seeing is actually possible for us. Maybe it’s not exact, perhaps it’s just an aspect of what we’re seeing, but there is something for us here, however it manifests. How can we reframe the icky feelings into something expansive? How can this be something that’s actually for us?

Exercise Two: Revenue Streams
This next exercise is for you if you are (or plan to) make money from the flowers you grow. If you are only growing for pleasure, that’s awesome, and you have my permission skip this one. But even if you think you *might* want to make an income from your flowers, please do this. Making money doing something you love is awesome. I did this exercise on some training that I can’t currently remember in order to give credit to (maybe Marie Forleo???), but it was so useful, I do it every year.
I want you to grab a pen and paper and write down TWENTY ways you currently are or *could* make money from your flowers or farm. Yes, twenty. I know that sounds ridiculous, but commit to coming up with twenty ways to make money and actually physically write each one down (do not do this in your head). They are not all going to be the greatest idea, but stretching your mind is where the potential magic hides (this is how we started distilling hydrosols from our flowers).
Planning
January’s biggest and most-daunting task is planning. On our farm, the goal is to grow a variety of flowers all season long, so that we have plenty of ingredients for our weekly deliveries, weddings, and events. In order to do this, a solid plan is key.
A growing plan that accounts for flowers across an entire season is no small task. Planning the farm literally takes me weeks. Take it slow and do not be discouraged. Also, don’t get too bogged down by the details. My first season, I agonized over every detail in my plan. Every. Detail. I was a monster.
The reality is that we’re working with nature. Your plan will likely be affected by the weather and life, in general. It’s OK if the plan isn’t perfect, it will very-likely change either way, so try and not stress it. No matter what, there WILL be flowers! And as former ASCFG President Jennie Love says, “Trust the field.”
I’ve intentionally listed the planning steps in a specific order as to how we determine what to grow here on the farm. Once I determine what I want to grow, I enter it all into my Seed Sowing & Planning Spreadsheet that calculates a seed sowing schedule, number of plants needed per bed, number of cell trays, etc., so that I know how much I need to order.
Seed Sowing & Planning Google Spreadsheet
I’ve included this spreadsheet as part of Flower Farmer’s Year, and you can find it here.
This spreadsheet is strictly being shared as a Google Spreadsheet, because anyone can access Goggle Spreadsheets for free. You *must* have a Google Account in order to access and use this spreadsheet.
Please note that the spreadsheet is READ ONLY to protect it for each user. You’ll need to download a new copy to your own Google Drive.
To do this, please use the following instructions:
- Open the Google Spreadsheet.
- Select File > Make a copy
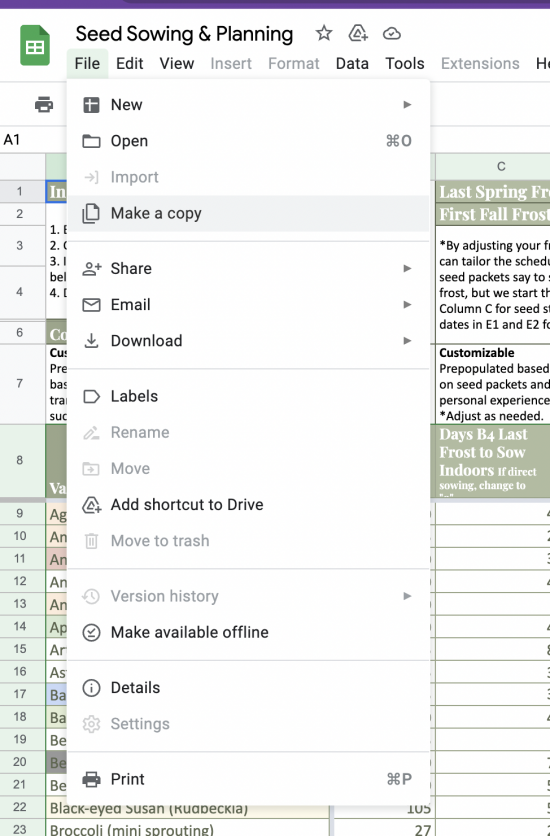
3. Select the field under “Folder” and select “My Drive”
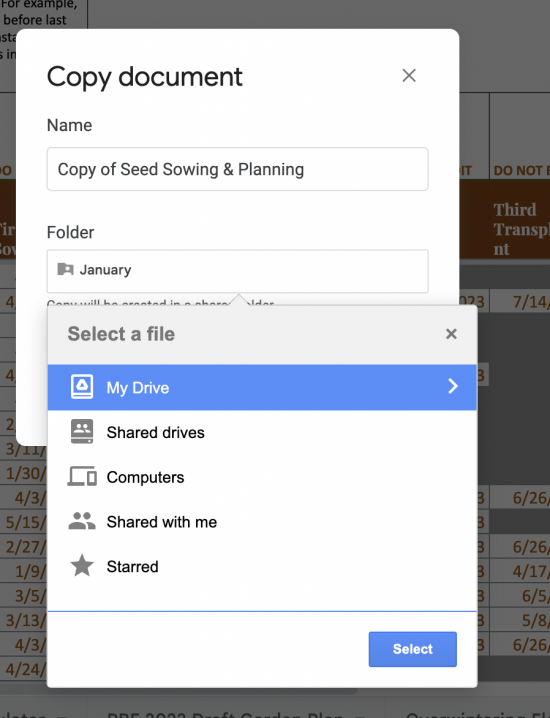
Now you have your own copy that you can edit.
Each tab has a template for you to use, but I also included my own plan as a reference point. This really is the brains of my operation and my exact playbook. I’ll explain more about this spreadsheet further below.
At this time, I cannot provide individual Google Account or Google Sheets support. Please use at your own comfort level.
Please Note: Please do not share this spreadsheet with others. This is for FFY members only (though please *absolutely* feel free to talk about it or share about it if you found it helpful . . . just not the actual sheet, itself . . . that’s just for you 🙂 ).
What Varieties to Grow
Before we can plan the field or a sowing schedule, we must decide what we actually plan to grow. This is all about understanding the seasonality of flowers, your unique climate, your business model, and what ingredients make a compelling design.
It’s also about growing what you like! I’ve listed these steps in an intentional order to help you get started, but I don’t want the methods to take away from your heart. My first season, I just grew whatever the hell I liked. Honestly, I still do. I now have a better understanding of what crops are most profitable for us (hello, lisianthus), but a lot of my choices are simply what I like (and you’ll see my thought process in this month’s Plant Profile when I dive into varieties . . . it’s a lot of heart, ha!). There are no “wrong” choices here. If you choose something and it doesn’t work out, it’s just a lesson learned.
Know Your Climate
As we go through the planning process, it’s important to understand your climate in order to choose plants that will grow well. If you’re just starting out, it’s challenging to know this right off the bat, but you’ll get better as you go. Being a good grower is all about understanding your environment and determining if/how you can re-create optimum conditions based on each variety’s needs. For example, some flowers like cool weather (ranunculus), while others like warm weather (zinnias), and others need a cool start and warm finish (lisianthus)!
Two key items are knowing your Hardiness Zone and First/Last Frost Dates. If you’re located in the U.S., you can find this information here. If you’re in another country, most countries have similar hardiness zoning and maps. Simply google “[your country] + hardiness zone.”
An Important Note about Hardiness Zones That *Most People Miss*
Hardiness Zones (or Planting Zones), though useful, are only based on the average annual minimum winter temperature. The U.S., for example, is divided into into eleven 10-degree zones by minimum average annual temperatures. Each zone is also divided into “a” and “b” segments. These represent five degrees of temperature difference.
In plain English, your zone number simply refers to how cold your winters get. The lower the number is, the lower the temperatures in that zone. Where I live in Mindoro, WI, we are Zone 4b, meaning our average minimum temperatures are -25°F to -20°F (yup, it can get freakin’ cold).
When a plant is rated for a particular zone, it’s referring to how well that plant will survive cold temperatures. While this is particularly useful when planting perennials, it is not as important when it comes to annuals.
There are many things that hardiness zones do not account for, like first and last frost date and many other climate conditions that will affect how well certain plants grow in your area. Just because you’re in the same growing zone as another grower, doesn’t necessarily mean the same varieties will work as well for you as they do for them (and vice versa).
Real-Life Example: My partner, Matt, used to board a horse in Montana (when he was a hunting guide in Wyoming). Montana Zones are very similar to Wisconsin Zones, but Zone 4b Montana is not the same as Zone 4b Wisconsin.
Zone 4b Bozeman, MT average last frost is June 1 – June 10, while Zone 4b Mindoro, WI average last frost is May 1 – May 10. Average first frost MT, September 1 – September 10. Average first frost WI, October 1 – October 10.
Although we’re in the same exact zone (because our winters similarly cold), WI has 2 more months of growing season (on average). Certainly, though, we’ve had late frosts in May and early frosts in September, so it’s all about knowing your climate!
Similarly, Bozeman is cooler in the summer (average highs in the 70s, average lows in 40s) versus Mindoro (average highs in the 80s, average lows in the 50s-60s). While Bozeman might get away with ranunculus in the early summer, it’s WAY too hot in Mindoro (wah, wah).
I hope this example shows you why it’s important to understand your unique climate, not just your zone!
Design by Season
If you’ve ever taken a flower farming course or floral design class, you’ve likely learned that a classic combination of ingredients include elements in the following categories: Focal, Spike, Disk, Filler, Sparkly/Airy. I like to add an additional category of Whimsy (basically, unexpected elements).
My goal is to have elements in each of these categories for the entire season. Here are some of my favorites:
- SPRING
- Focals: Tulip, Peony*, Ranunculus, Rose*, Large Iceland Poppies
- Spikes: Snapdragons, Stock, Larkspur
- Disks: Anemone, Calendula, Narcissus, Small Iceland Poppies, Snowball Viburnum*, Sweet William
- Filler: Raspberry Greens*, Ferns*, Willow Branches*, Solomon Seal*, Lilac*, Bells of Ireland, Orlaya, Queen Anne’s Lace
- Airy/Sparkly: Sweet Peas, Bachelor’s Button, Chinese Forget-Me-Not, Saponaria, Agrostema
- Whimsy: Apple Tree Branches with Blossoms*, Snow Peas
- SUMMER
- Focals: Rose*, Sunflowers, Lisianthus, Dahlias, Zinnias
- Spikes: Snapdragons, Celosia, Russian Statice, White Mignonette,
- Disks: Ageratum, Cosmos, Phlox, Strawflower, Yarrow, Zinnia
- Filler: Basil, Ninebark*, Scented Geranium*, Yarrow, Feverfew, Love-in-a-Puff Vine, Statice, Amaranth, Chocolate Lace Flower, Gypsophilla, Mint, Oregano
- Airy/Sparkly: Nicotania, Grasses, Scabiosa, Craspedia, Jewels of Opar, Flax, Globe Amaranth, Thistle*
- Whimsy: Cherry tomatoes, Peppers, Crabapple Branches*, Asparagus Fronds*, Small Summer Squash
- FALL
- Focals: Rose*, Sunflowers, Lisianthus, Dahlias, Zinnias
- Spikes: Celosia, Millet
- Disks: Ageratum, Cosmos, Phlox, Strawflower, Yarrow, Zinnia
- Filler: Basil, Eucalyptus, Scented Geranium*, Ninebark*, Feverfew, Love-in-a-Puff Vine, Statice, Strawflower, Amaranth, Chocolate Lace Flower, Hydrangea*, Gypsophilla, Mint, Oregano
- Airy/Sparkly: Nicotania, Grasses, Scabiosa, Craspedia, Jewels of Opar, Flax, Globe Amaranth, Grains, Thistle*
- Whimsy: Cherry tomatoes, Peppers, Small Pumpkins
*These are perennials, trees, etc., so they are not included in our Seed Sowing plan.
An Unconventional Opinion: If you’re just starting out, people will often advise starting small and getting good at one thing. That’s not bad advice, especially if you’re prone to overwhelm, but I went the opposite direction and I don’t regret it. Our first season, I grew anything that piqued my interest. I made a lot of mistakes, and I definitely overwhelmed myself (I still do), but I don’t regret it for one second. If I wasn’t delusional my first season, I’d probably never have grown lisianthus, and they were the backbone of our production that year (and still are). Also, I LOVE growing plants and getting to know them, it’s just in my nature. If you feel compelled to “grow all the things” I say go for it. You’ll learn a lot.
If you’re in the opposite camp and feel overwhelmed just looking at the list above, I would focus on focal flowers for each season. The reason for this is that you can sell focal flowers all by themselves! We sell tulips, sunflowers, lisianthus, dahlias, and soon peonies by the bunch. You can add in other flowers as you feel more comfortable.
If you’re looking for an easy win, I think sunflowers are a must. The seeds are affordable, you don’t need to start them early indoors, and you can grow a lot of them in a small amount of space. You can sow the single-stem varieties every 7-10 days (4–6 inches apart) and you’ll have focal flowers all summer/fall in as little as 55 days. I once read about a family that sowed only sunflowers all summer, sold them weekly by the bunch, and used the profits for a family vacation. P.S., they come in a lot of really unique colors, and I think they can even look good in high-end arrangements.
Above all else, follow your gut and heart over anyone else’s advice (including mine)! I’m an avid researcher, it’s true, but I truly believe that deep within us, we know exactly where we’re meant to go (if something within you is strongly pulling you toward a direction, listen).
Action Step: It’s time to brainstorm! Make a Wishlist of all of the varieties that are of interest to you (if you’re not sure, don’t sweat it, we’re just brainstorming at this point). This is one of my favorite parts of planning! I do suggest brainstorming by season. Even if you’re not exactly sure, do your best. You can start with some of the favorites I’ve listed above.
This is also a great time to review the exercises from the beginning. Go back and look at your “Inspire” board(s). Were there certain flowers that you consistently saved? If you have a photo of a flower, but you’re not sure what it is, feel free to email it to me at maggie@petalbackfarm.com subject line: Flower Identification. I actually love doing this, ha. My florist friend texts me photos of flowers all the time.
And what about your potential revenue streams? Are there certain flowers you’d include based on your revenue ideas? For example, maybe one of your ideas was dried flower wreaths in the fall. If so, you’ll want to include a lot of dried floral varieties in your plan!
Additional Resources
Two great resources for browsing available flower varieties are Johnny’s Selected Seeds and Floret Flowers. Don’t worry about ordering anything at this point. We’re just browsing their catalogues for brainstorming purposes.
Johnny’s has an entire flower catalogue, and you can even search by cut flowers, color, bouquet fillers, etc. When you click on a certain variety, there is a ton of info about each one that can help with your decisions.
For example, they have an entire growing section with EACH individual variety that includes sowing information (when to sow, what temperature is required for germination), when to transplant, plant spacing, soil requirements, zone hardiness, how to harvest for both fresh and dried (if applicable), and the most-common uses for that particular variety (e.g., cut flower, dried flower, edible, medicinal, beneficial insect attractant, borders, mass plantings, cottage gardens), and so much more. Frankly, it’s an invaluable resource and I’ve found their information to be most reliable.
As we progress through planning, we’ll narrow down our list.
Business Model
When choosing varieties, it’s important to understand your business model. On our farm, we sell market bouquets and arrangements through our online shop, and then deliver to local businesses and certain Zip Codes on Fridays (I have a flexible work schedule and am able to take Friday mornings off for this purpose, Matt and I do it together, and it’s super fun). We also deliver to florists on Fridays or offer farm pickup for them on other days. We also grow and design flowers for weddings and events. I’ll occasionally do workshops upon request.
Action Step: Review the Revenue Streams exercise. First review your current revenue streams (if you have them). Are they working? Are there any you’d like to cut? What about the other ideas? Did anything spark excitement in you? Narrow this list down to ways you actually intend on making an income from your flowers or plan. You’ll want to consider these when narrowing down your Wishlist.
Choosing a Color Palette
The next step is determining what colors to grow, so that you can narrow down your selections even further when choosing specific varieties (for example, Scabiosa comes in many colors, but we tend to stick to black, white, and salmon).
Conventional wisdom usually says to choose rich vibrant colors for grocery/markets, textural ingredients and unique combos for urban environments, pastels and monochrome for weddings and high-end markets.
Action Step: Take a look at your visual inspiration again. What colors do you consistently see? What about your revenue streams? How and where do you plan to sell your flowers? Who is your customer or recipient of your flowers? What are they drawn to? Consider the seasons you plan to grow flowers. While there are no rules, spring lends itself to soft colors, summer to bright colors, and fall to moody hues.
I’d also suggest studying color theory. Here is a good article that discusses the basics. I have this image saved as the background on my phone to easily reference and have it top of mind for inspiration:
I’ve said it before and I’ll say it again: grow what you like! I tend to lean toward: soft, moody, and muted colors, unique blooms, some real wow-factors, and a lot of textural elements. Sometimes I like more refined and other times I lean more toward wildflower/bohemian.
If a couple books a wedding in advance, we’ll grow varieties in their color palette (SO many dusty blue requests for 2023). We also grow some vibrant colors because I have a florist friend who loves rusty/deep reds and oranges.
Basically, if someone wants something, I’ll do my best to grow it 🙂 but I definitely think there is value in streamlining your color palette so that everything you grow works together. Each month, I’ll dive deep on a plant profile and share every specific variety we grow (including ones we’ve cut from production and why), and where we source our seeds/plants. January is Lisianthus!
Action Step: Create a list of colors/palettes for your plan. When ordering seeds, refer back to this when choosing specific varieties so you keep your selections on brand.

Time & Budget
Certain plants are more of an investment: whether in time, money, or both! Most annuals can be grown from seed, which tend to be more cost-effective and are ready your first year.
Plants produced from bulbs, tubers, or corms are planted in the fall and ready the following spring, or planted in the early spring and ready later in the summer. These are more-expensive than seeds, but produce some of the most beautiful flowers.
Perennials, on the other hand, are one of the largest investments in time and money. Most are grown from bareroots or small plants, which usually cost significantly more than seeds, bulbs, or tubers (though some rare dahlia tubers are comparable!). Some perennials can be grown from seed, but they take a much longer time to reach maturity. Even bareroots and small plants may not be ready to harvest their first year. For example, peonies (which I love) take at least 3 years to establish before you can harvest them (and they are a significant investment).
If you have the capital to invest in perennials from the start, most flower farms recommend it, because these are usually a great return on your investment. However, if your budget and/or time is limited on how soon you want to make money, annuals are a great way to go!
On our farm, we do all of the above. We’re focused on annual production of seeds, bulbs, corms, and tubers, but we’ve also invested in perennials like peonies, roses, ninebark, viburnum, etc.
Narrow Down Your Wishlist
Now that we’ve narrowed in on business model, color palette, time/budget, it’s time to narrow down your wishlist. While we considered some of these items while making our wishlist, here are a few things keep in mind when whittling the list down further:
- Climate
- Your business model (revenue streams)
- Variety volume (do you want to experiment with growing many different varieties, or perfect a limited number?)
- Seasons (do you want to grow flowers for every season, or just in the spring/summer/fall, etc?)
- Budget & Time (annuals or perennials / seeds, bulbs, or bareroots/plants)
- Color Palette
Action Item: Go through your wishlist and consider each variety based on these items to help narrow down your list. Next, we consider growing space in order to narrow it down even further.
Field Plan
Once we know *what* we want to grow, we need to determine *where* and *how much* to grow. This is highly dependent on the physical space you have and/or the amount of time you’re able to dedicate to your flowers.
A Note on Size
The size of your growing area will completely depend on your unique situation. For one person, 1/4 acre is a lot of work, but manageable. We started with a 1/4 acre. There was two of us, but we both worked full time, and Matt worked out west from late August–late November.
Now, we are at about 1/2 an acre with the addition of the high tunnel, expansion of our dahlias, and our peony/perennial field. However, Matt is now on the farm full time. Though, and just to give you an idea of our situation and what’s feasible for us, I handle the majority of crop planning, systems, newsletter, web design/maintenance, marketing, social media, photography, sales, customer service, harvesting, design, etc. while working full time. He does the majority of building things like the tunnel, our cooler, the shop, equipment maintenance/repairs, anything that requires a tractor, dividing dahlias, tulip harvest, CLEANS (I’m really good at making messes and terrible at picking them up), etc. We’re probably 60 me / 40 him on other tasks (field prep, water lines, sowing, planting, weeding, etc.), as he has other responsibilities like running the AirBnB, renovations, taxidermy/hunting. Hopefully that gives you somewhat of an idea of what’s doable (though this will all depend on your unique situation, skill level, and resources).
Our Farm
Here is a complete behind-the-scenes look at what we’re working with.
We have more field space than we could ever need. This is not the case for everyone. Do not be discouraged if you do not have a giant field to work with. Many of the big names in the flower farming world started in their back yard or a rented community garden plot. You can grow a TON of flowers in a small amount of space. P.S., the grass is not always greener: our fields have serious nutrient deficiencies and almost zero organic matter (I’ll share more about how we are working with this in future FFY months).
We grow the majority of our crops in the fields, all-together about 1/2 acre.
Aside from the fields, we have a kitchen/cottage garden. We also have perennials around the farm and AirBnB for landscaping. While I’ll use all of these in wedding designs, most of our crops are grown in the field in standard rows.
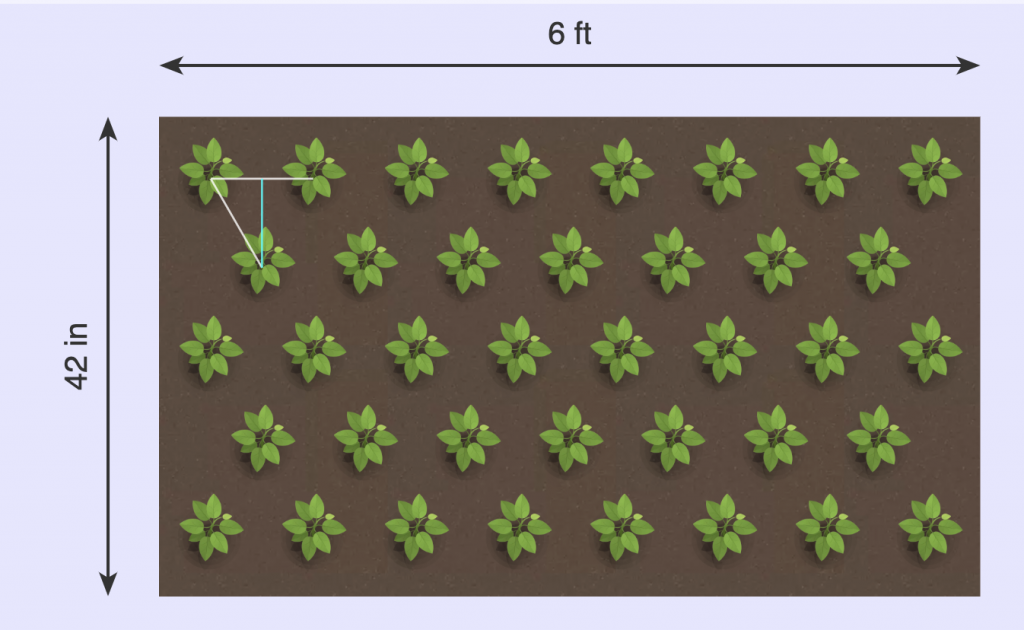
Standard Rows
The majority of our crops are grown in rows that are 4 feet wide and 100 feet long (with 2-foot walkways). In 2023, we are moving the majority of our dahlia production to a field at our AirBnb, which are also 4-feet wide, but approximately 25 feet long (just due to the field layout, no other reason). Standard rows are often recommended because it makes everything else on the farm more efficient (water lines, landscape fabric, etc.).
Spacing Considerations
Most of our flowers are grown at standard spacings of 6″, 9″, 12″, and 18″ depending on the varieties. Most reliable seed companies will list spacing recommendations (Johnny’s website is an awesome resource for this), but I also include what spacing I use in the Seed Sowing & Planning Spreadsheet.
It’s important to know spacing when planning, especially if you plan to grow in landscape fabric. We grow most things in landscape fabric with the exception of perennials, dahlias, vines, and anything direct sown. Here is a great video on landscape fabric if you’re not familiar with growing this way. The only thing we do differently than the video is that we plant in triangles versus squares, because you get a few more plants per square foot this way.

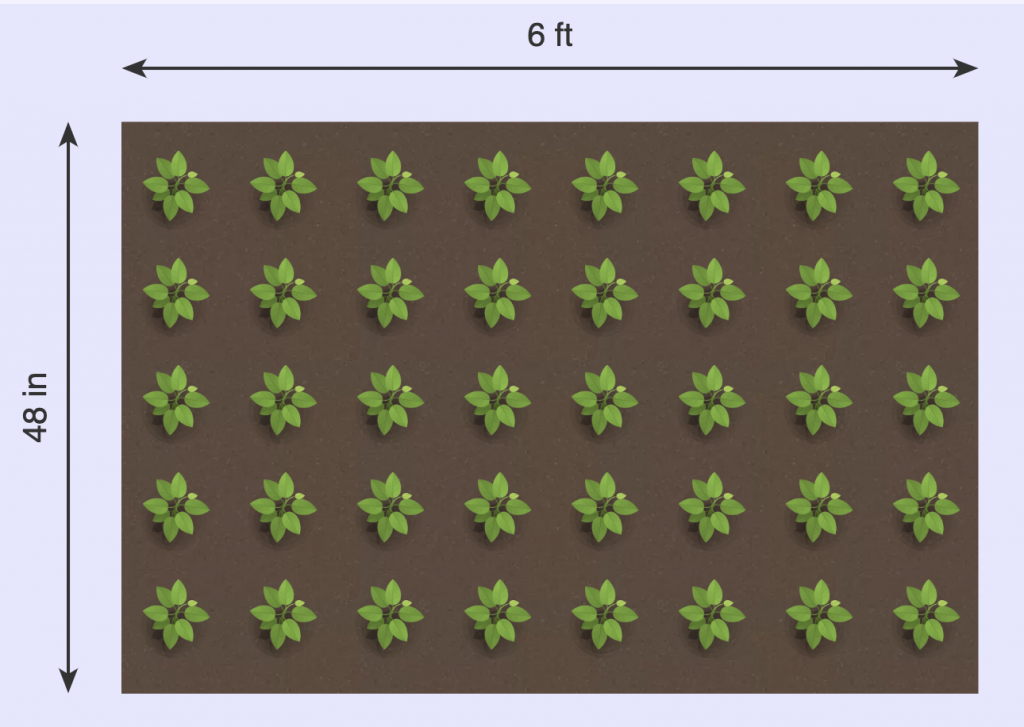
The reason it’s important to know spacing when it comes to landscape fabric is because most growers have their landscape fabric at standard sizes that accommodate their beds. In our case, we have both 100-ft and 50-ft fabric that are pre-burned with spacing. I’ll often break up our 100-foot beds into two 50-foot beds, four 25-foot beds, or ten 10-foot beds (for trialing new varieties). If all the varieties are the same spacing, I can use one long piece of landscape fabric with pre-burned holes. So, I try to plan plants with similar spacing and needs in the same bed.
Similarly, I’ll group direct-sown plants together in a bed, since that bed will not get landscape fabric.
Plotting Out the Field Plan
Determining the field plan is a little like figuring out a puzzle each year. The reason we have a new plan each season is because we practice crop rotation for plant and soil health (basically, no crop is planted in the same spot two years in a row unless it’s a permanent perennial, like peonies). Every year, I do this in my Seed Sowing & Planning Spreadsheet on the “Garden Plan” tab.
Please note: I grow many things other than flowers, just FYI that some things in my plan are not for the flower farm (also, landscape perennials, the AirBnB dahlia field, and the kitchen garden are not in my plan because I don’t need to work around them as they are in separate fields).
Action Step: Measure your plantable area and decide how much you can reasonable take care of. At this point, design your garden/space beds. You can do this in the spreadsheet, though feel free to do this on grid paper if you’re a pen-and-paper person. While standard beds are much more efficient for planning, I do love me a wild cottage garden. This part will truly be unique to you! Either way, you’ll want to list the actual dimensions of each “bed” by length and width if you plan to use the planning calculator (I did set it up so that each bed can be different).
Once you have your design and garden beds, you’ll want to take your initial list of plants and plot them out in your beds. Start with your must-haves by season. This will also help narrow down your choices. This won’t be an exercise that’s one and done. After you figure out your seed-sowing schedule, you might decide you want more space for sunflowers, for example, after you realize you can have 8 weekly successions. This is a balance act of deciding how much of one plant is right for you, your business model, your budget, and your climate. This all takes time, so be patient with and kind to yourself!
Seed Sowing Schedule
Now it’s time to create our seed sowing schedule. Every year, I do this in my Seed Sowing & Planning Spreadsheet on the “Seed Sowing Spring” tab. I’ve set this up to automatically calculate sowing and transplant dates for multiple successions (based on frost dates), and it even accounts for earlier sowings based on whether or not the variety is a hardy annual or grown under cover (low tunnel or high tunnel). FYI, for anything that can handle a little cold, I mark as a hardy annual (most reliable seed companies will include this information).
I added a blank template for you to use, but I’ve also included an example of my own personal seed-sowing schedule to give you an idea of how I use it. It took me years to refine this spreadsheet!
A note on the plant calculations for any of you number nerds: These calcs are based on triangle planting (as described above). I rarely see calculations that actually correctly calculate this. They usually don’t account for decimals and the fact that you cannot plant a fraction of a plant.
A note on Floret spacing: If you took the Floret Workshop and use and like their Calculator Spreadsheet, please stick with it (it’s a wonderful tool). If you use my calculator and wonder why the calcs are different for spacing, I believe it’s because they futzed/adjusted the calculations to account for some additional spacing in the beds. I’m explaining this for a reason, because this confused me initially, and ultimately led to some of my own adjustments further explained below.
I think the reason they did this is because even though their beds are all 4 feet in width, they adjust the spacing a bit to account for space on either side of the row. For example, their 9″ spacing template for landscape fabric only accounts for 5 rows, when mathematically, 9-inch spacing in 4-foot wide rows can technically fit 6 rows with a little room to spare on either side. This isn’t right or wrong (I *love* Floret and everything they do for the flower farming world), but I just wanted to point out why the calcs might be slightly different because this really confused me at first.
If you use their row spacing (which is on their blog, so it’s public knowledge), these are the width spacing you’ll need for the calcs (the actual beds in real life are all 4-feet wide):
- 6″ spacing / 7 rows: 3.5 feet bed width
- 9″ spacing / 5 rows: 3.5 feet bed width
- 12″ spacing / 4 rows: 4 feet bed width
- 18″ spacing /. 3rows: 4.1 feet bed width
The reason I’m even calling any of this is out is because when I started, we created our landscape fabric templates based on Floret’s recommendations, so this is still what we use (and love). For this reason, though, you’ll see my bed-width dimensions marked this way in the sheet (even though all of our beds are *technically* 4-feet wide) for crops that I use landscape fabric (because they are already pre-burned this way, for example, our 9-inch spacing beds only have 5 rows).
You still with me? If not, don’t sweat it. You can use any spacing in inches on my spreadsheet (3″, 4″, 24″, 6.5″ whatever). This will tell you exactly how many rows and plants can truly fit. If you want to change the amount of rows, the instructions tell you what to do and will calculate the plants accordingly. And shout out the fine folks from concalculator (which I used to create some of the calcs in my sheet, because they are the most mathematically correct ones I’ve seen).
All that to say, use whatever works for you! Honestly, things like how flat or raised the bed is will affect the amount of plants, and rarely do we perfectly fill every bed either way, but I hope that explanation was helpful for any of you number folks.
And if that made your eyes glaze over, this spreadsheet nerd sincerely apologizes, HA!
Action Step: Fill out the seed sowing schedule based on the instructions in the sheet and refine your field plan as necessary.
Number of Plants
Next, I determine how many plants are needed (so I know how many seeds to order). I enter this information in the “Plants/Trays Calculator” tab.
Action Step: Copy and paste your varieties to the “Plants/Trays Calculator” tab and fill out the customizable fields. There are instructions on the sheet, but essentially, this will tell you how many plants you need per bed based on your dimensions/spacing, as well as how many cell trays it will take to accomplish this. If you’re direct sowing, you can ignore the cell trays. The amount of plants will help you decide how many seeds to purchase. We’ll dive deep on seed starting in February, but I have a blog post here if you want to dive in.
Google Sheet Notes
I included the spreadsheet as a helpful tool and to show you exactly what we do on our farm. The calculations are based on generally-accepted planting principles. I’ve left notes as to where you can adjust things based on your individual and unique needs.
Also, I want to call out that my spreadsheet was built on those who kindly shared before me. I’ve used numerous spreadsheets from many growers over the years (Johnny’s, Floret, Sunny Meadows to name a few). They all had amazing elements that influenced my own, but ultimately, I created my own to meet my needs. Some of the items in my sheet I learned from them and others, some of the calcs come from concalculator , and many are my own. It has gone through many iterations. While I created this spreadsheet to work for my own operation, I hope you can use it (or take and adjust it) for your own. You can watch a video of me explaining how I use the spreadsheet here and here.
Some people love spreadsheets, while others prefer pen and paper. The principles still apply, please use what works best for you. I LOVE the efficiency of spreadsheets, but I am also a physical pen and planner person. I get everything set in my spreadsheet for the year. Then at the beginning of the week, I filter the rows by date, and fill in my planner for the week. I’ll review each morning and adjust as necessary.
Helpful Tip: After you create your initial copy, create an additional copy of your copy specifically for the current year. This way, if you goof something up, you always have the original (with all of the calculations) to refer back to. Each season, create yet another new copy. This makes filling in the information MUCH less daunting. Now, I only make a few tweaks here and there based on what I’ve learned season after season.
Helpful Shortcuts When Working in Google Sheets
- Copy
- Mac: Command+C
- PC: Ctrl+C
- Paste
- Mac: Command+V
- PC: Ctrl+V
- Undo
- Mac: Command+Z
- PC: Ctrl+Z
- Redo
- Mac: Command+Shift+Z
- PC: Ctrl+Shift+Z

Fall Planting & Planning
Many flowers can be overwintered by starting in late summer or fall, which result in earlier (and often times better-quality) blooms when compared to spring, field-planted flowers. However, this is highly dependent on your geographical location.
Below is a great note from Johnny’s Selected Seeds on the topic:
Naturally, growers in different locations will experience different results. Some crops will overwinter successfully in your area, while others will not, and results will often vary from year to year as well. Plus, even if a particular flower crop overwinters successfully for you, it may not provide a financially viable opportunity, whereas others may excel in this regard.
For all these reasons, we encourage you to start by conducting your own small-scale trials before scaling up your production plans. Then continue to experiment each year, to see what is feasible and learn more about the limits and possibilities of four-season cut-flower production on your farm.
Johnny’s Selected Seeds
So you might be wondering, do we overwinter flowers on our farm? And if so, where is fall sowing/planting in our plan?
The answer is, yes, we do . . . or at the very least, we’re experimenting!
In season’s past, I’ve only direct sown in late fall/early winter. Flowers that work best for us include: Larkspur, Bachelor’s Button, and Chocolate Lace Flower. We’ve also successfully overwintered direct sown bupleurum, bells of ireland, and nigella (but they are so-so, none of these have great stem length for me).
After receiving a grant in 2021, we built our high tunnel in 2022. I only did a few small experiments for the upcoming season, but plan on doing much more this fall, based on the super-helpful resources from Johnny’s. I’ll share all of the juicy details in FFY as I learn more.
Johnny’s Seeding Date Calculator & Overwintering Trials
For planning, I use Johnny’s Seeding Date Calculator, which is based on their multi-year overwintering trials. This spreadsheet works perfectly as is for me, no adjustments needed, so I imported the data into my personal Seed Sowing & Planning Spreadsheet. Since it is copyrighted, I did not include it on the copy I shared with you. However, you can find it for free here, and import into your own as well. In order to use the calculator, you need to know your last 10-hour day of the year. You can use a calculator like this one to determine this.
If you’re serious about experimenting with overwintering, especially if you’re in a colder zone, I highly suggest checking out Johnny’s Overwinter Flowers Resources page, where you will find the complete listing of their crop and method videos, plus spreadsheets and PDFs detailing more than 25 cut-flower crops they have successfully overwintered in their Zone 5a unheated tunnel. Their results include yield, rate of survival, and specific variety recommendations!
This is incredibly exciting if you’re in a colder zone (like me)! If you’re in a warmer zone, there is a lot of information out there regarding overwintering, and I am super jealous. Until Johnny’s trial, there wasn’t much out there for those of us in Zone 5 or below. Their results are promising, and I hope we find success on our farm as well.
Though slightly cooler, our climate and latitude are similar, so I plan to follow their schedule. For reference, Johnny’s research farm is located in central Main, Zone 5a, Latitude 44.6°N, last 10-hour day first week in November. At our farm in Mindoro, Wisconsin, we are Zone 4b, Latitude, 44.0211° N, last 10-hour day first week in November (in fact, this is easy for me to remember because it’s Nov 4, my birthday).
OK, that wraps up planning, which is the majority of January farm tasks, woowhoo, you made it! Truthfully, I never finish planning in January. The only reason I did this year was so that I could share my plan with YOU!
But guess what? Planning is not the only farm task in January!
Inventory & Ordering
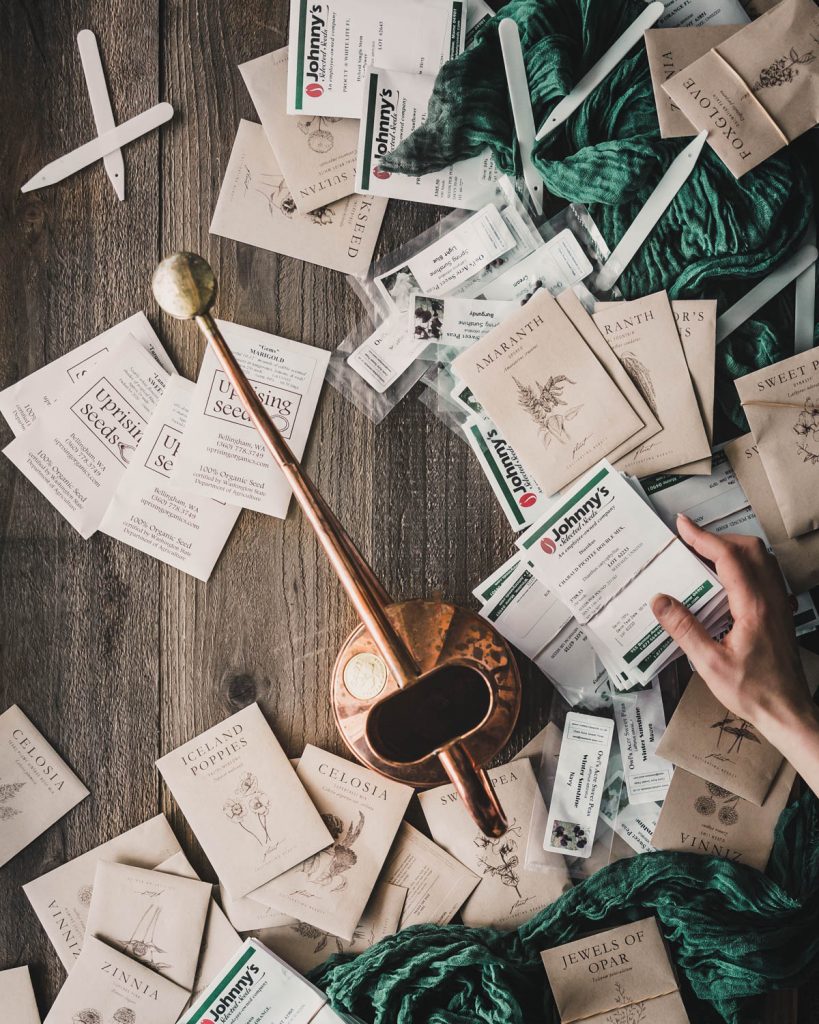
Seeds and Seed Starting Supplies
I order the majority of my seeds in January, but I know many growers who order much earlier, so plan accordingly. The only seeds I order earlier are ones that have had recent shortages (e.g., eucalyptus, ‘Cherry Caramel’ phlox).
Before I order, I try to take inventory of the seeds I already do have. And if I’m totally honest, this is also when I finally reorganize my seeds after a season of chaos! I will fully admit that I ordered a bunch of seeds last week, only to find a random box tucked away in a corner that had already had many of the same varieties I *just* ordered. Don’t be me.
This year, I’m upgrading my random boxes to photobox storage, which has been floating all over the gram. I don’t know the origin of this idea, but I will forever credit my pal Breanne of Burch Acres, because that’s where I saw it first. Many people choose to organize by when they sow, but as someone with multiple successions, I’m sticking to alphabetical order.
Action Step: Organize and review current inventory. If you’re using the Seed Sowing & Planning spreadsheet, refer to your “Plants/Tray Calculator” tab for number of plants needed. I have a blog post that lists my favorite places to order seeds here. This is also the time to take inventory and restock on seed-starting supplies. I created a seed-starting supply checklist that you can find here.
Bulbs and Corms
Ugh, look, the standard practice was always: order bulbs/corms for next season when the current season is blooming. So, if your tulips are blooming in April/May, that’s when you order your wholesale bulbs. This was *already* early and hard to make decisions. However, this seems to get earlier and earlier each year! I had flower friends tell me they already put in their bulb order for Fall 2023 planting in 2022! Uhhhhh WHAT?!
I hate to feed this frenzy, but I am going to lay it straight to you. I ordered my tulip/narcissus bulbs and ranunculus/anemone corms this month. I asked our wholesalers if this is necessary or if it makes things difficult for them. The answer was no on both accounts, but they are happy to take the orders, so I just got it done.
Action Step: Do you need to order now? No, but some varieties might be sold out if you wait until bloom time.

Dahlias
In February, we’ll be diving deep on dahlias. Dahlia mania is real folks! There are sales that start in fall and go through spring. What I love to do is keep a dahlia wishlist. I search the varieties on dahliaddict.com, which lists a bunch of sellers of the variety, and I basically participate in dahlia sales most winter months.
Action Step: If you’re interested in dahlias, check out dahliaaddict.com and put sales in your calendar and set alarms (they go quick).
Bareroot Roses
We started growing roses in our high tunnel, and I’m basically obsessed. Time will tell how this endeavor plays out, but I’ll be ordering more bareroot roses this month.
Action Step: If you’re interested in bareroot roses, check out Menagerie Flower (her sale is 1/25), Heirloom Roses, and David Austin Roses to get you started.
Weddings & Events
I review all weddings and events we have booked for 2023 in Honeybook and make sure I have flowers accounted for in my plan and add reminders on my calendars/planners.
Honeybook is what I use for weddings, events, and photography projects. It’s basically project planning, client communication, estimates, contracts, invoices, payment processing all in one.
If you’re just starting out, you likely don’t need this. But once you start booking more clients, it’s a super-efficient tool. If you use this link, you can get 20% off (and I get a little kick-back too).
Sowing
I’ll dive deep on starting seeds indoors (no greenhouse required) in February, but we are starting a few seeds in January:
- Dusty miller (High Tunnel)
- Snapdragon (High Tunnel)
- Eucalyptus (High Tunnel) (though I would start this if growing in the field as well, because it’s sloooooow)
- Poppy, Iceland (High Tunnel)
- Bells of Ireland (High Tunnel)
- Canterbury bells (High Tunnel)
- Stock (High Tunnel)
- Sweet pea (High Tunnel)
- Orlaya (High Tunnel)
We’ve started Lisianthus from seed in the past, but this season I’m strictly planting plugs from Farmer Bailey.
Action Step: If your plan calls for it, begin sowing seeds. We’ll dive deep on seed starting indoors in February, but I have a pretty in-depth blog post if you want to dive in.

Business & Taxes
In the United States, tax season is upon us! Don’t worry, I’m cringing too. January is the time to get your tax junk in order, but it’s also a great time to review your business and business goals. If you’re just starting out but intend to sell what you grow this year, you want to start thinking about these things from the beginning.
Please note that what I share in this section should not be considered business or tax advice. I am not a lawyer, MBA, or tax professional, this is just a fellow grower and business owner sharing her personal experience.
OK, now that that is outa the way, I don’t think this gets talked about enough. While FFY is not a deep dive on running a business, running a farm also means running a business! When you start a business, it can be a bit intimidating, especially if you’re not from an entrepreneurial family (Iike me).
If you are a badass business owner, you can skip this section.
If the business and tax side kind of makes you hyperventilate, please know that you are NOT alone and I have some action items below that I hope will bring you some peace of mind and get you one step closer in the right direction.
I consider myself a fairly intelligent person, but learning how to run a business is a lot, like a lot a lot. The information isn’t always clear. There are federal laws and state laws, and federal, state, and county tax obligations (and erm, other countries, hello my non-U.S. pals)! And like, why are government websites *literally* impossible to understand?!
If you don’t have it all figured out, that is OK! Think about it: what new business owner does? I just want for you (and me) to NOT look away, to not put our heads in the sand. Just take it one step at a time, and remember that you’re further along today than you were yesterday.
If you want to turn your hobby into a business: someone once told me that when you take the first step in legitimizing your business, it magnifies your momentum forward, propelling you toward new opportunities and doors will open. I have personally found this to be true, and I say this to you now, because all of the not-so-fun aspects of starting a business have been totally worth it.
If you are or intend to make money from what you grow (I mean, hell yes, right?), you want your business set up properly earlier rather than later. Below are the things I WISH someone would have shared with me when starting mine.

Research Requirements
Action Step: Look up your local taxing authority, and research the requirements to operate your business. Most have really helpful resources that you can read online or offer additional support if needed. My favorite opening line when asking business help is: I’m new to owning a business, I don’t come from an entrepreneurial background, please talk to me like I am 4 years old.
The requirements for your business will depend on where you’re located. In the U.S., for example, each state, city, and even county have different requirements.
You want to look into things like: do you need a license or permit to sell flowers? If you plan to create wholesale accounts to take advantage of better pricing/nontaxable purchases, what’s required? In the U.S., you usually need a resale certificate to set up wholesale accounts. Are you obligated to collect sales tax? If so, how do you register to collect sales tax and how much do you need to collect? And what the heck do you do with it after you collect it? (Answer: in the U.S., you need to remit it to the state).
Your local taxing authority will have all of the requirements.
Our Farm: In my home state of Wisconsin, we refer to the Wisconsin Department of Revenue to research county, city, state, and federal requirements for our small business. Our business is registered and we have an Employer Identification Number (EIN), also known as the Federal Employer Identification Number or the Federal Tax Identification Number. For wholesale purchases, we have a resale certificate (obtained from the DOR website). In Wisconsin, we are required to remit both state sales tax (5%) and county sales tax (if the county has a sales tax, usually 0.5%). In order to collect sales tax, we had to register for and obtain a seller’s permit. For every purchase, we collect and remit sales tax (again, this is all done through the DOR website).
A note on collecting sales tax: Your sales tax obligation is at the location of delivery of goods. This is important for anyone delivering flowers (or tubers or bulbs or whatever) out of state (or in another county). Your sales tax obligation is in the state/county where your goods are delivered.
In plain English: if my farm and business is located in Wisconsin, but we deliver flowers to Minnesota for a wedding, the sales tax obligation is technically in Minnesota.
But you might not have a tax obligation, because each state has different economic nexus laws. For example, if you don’t have a physical presence in a certain state and make less than $100,000, you *may* not be required to remit sales tax (these laws are different by state and are always changing, digital goods are even harder to interpret).
Again, this is NOT advice, definitely make sure to consult a tax professional, these are just things I learned while panic googling, hyperventilating, and speed-dialing my boss (who is also my friend . . . I work for the College for Financial Planning, my boss is the Dean, and I’m surrounded by finance nerds . . err professors . . . and tax lawyers).
I joke, mostly, knowledge is power, and at the risk of sounding dumb, I’m sharing what I’ve learned along the way, so you don’t have as many “oh $hit” moments like me!
Choosing a Business Structure
Action Step: Research what kind of business you want to form. Most new businesses start out as sole proprietors/partnerships, because they’re super easy to set up. However, there is no distinction between your business assets and your personal assets.
In plain English: if your business was to run into legal/money trouble, your personal assets could also be on the line.
As businesses grow, they’ll usually form a new type of business entity, like a Corporation or Limited Liability Company (LLC), to separate their personal assets from their business assets.
Always get business and tax advice from a professional (again, I know), but here is a little breakdown:
- Sole Proprietorship and Independent Contractors: Sole proprietors and independent contractors are self-employed people who haven’t set up formal business entities and who are not classified as employees. They file business taxes using a Schedule C and have to pay self-employment taxes.
- The difference between the two is how they earn income:
- Independent contractors do specific tasks for clients for a set fee
- Sole proprietors may do contract work, but may also have other revenue streams, like selling their own products to customers
- Great option for businesses just starting out, especially if what you are doing is a hobby that you are making a little income from. No distinction between personal assets and business assets.
- The difference between the two is how they earn income:
- Corporation and Limited Liability Company (LLC): While there are more steps, requirements, and fees for setting up a Corporation or LLC, both protect company owners from personal liability for business obligations
- Corporations are owned by “shareholders” while LLCs are owned by “member(s)” (either a single member or multi member)
- By default, Corporations are taxed as a C corp
- Single-member LLCs are automatically taxed like sole proprietorships and multi-member LLCs are automatically taxed like partnerships. However, an LLC can also elect to be taxed as a C corp or (if it qualifies) an S corp (these all have different filing and tax requirements).
Our Farm: Our business is registered as an LLC, but my photographer work is filed as an Independent Contractor.
Filing Yearly Returns
Action Step: Consider finding a reputable accountant. If you are comfortable doing your own taxes, by all means, go for it, but a professional accountant will 100% save you time, and if they are half-way decent at their job, they are going to save you money, and 1,000% give you peace of mind.
Our Farm: I did my own taxes for 10 years as a corporate W2 employee and independent contractor. However, once we started the farm, I hired an accountant, and I highly recommend it.
Regardless of your business structure, it is a really good idea to separate your finances. Some of the best advice I got was from Matt’s brother to set up a separate account/card specifically for the business. This separates all of the expenses and makes things much easier come tax time. It’s easy for me to record income and expenses and share them with our accountant.
I don’t use any fancy systems like Quickbooks. I just use a good ol’ spreadsheet and send it to my accountant.
Additional Resources
- Profit First. Read it.
- Farm Finances Glossary
- The Dirt on Flowers Podcast, Episode 27. Taking the Stress out of Bookkeeping. Listen to it. I actually suggest searching every Ashley Ford/Pretty Penny Accounting podcast episode, because they all have great nuggets of information, but this one is actually with flower farmers (and I love Lindsay and Shannon’s pod!)
Content: Social Media & Newsletter Ideas
In today’s world, content is king. Social media, whatever our opinion of it, is a regular part of most businesses. If you’ve ever signed up for a social media webinar (it’s OK, we’ve all done it), you’ve likely heard that the number one social tool in your business is your newsletter.
Of all the garbage out there, this is actually excellent advice.
All of the social places you share (website, blog, instagram, facebook, pinterest, twitter, tiktok, whatever you do) should be with the goal of connecting, but also getting people to connect with you OFF those apps and onto your newsletter, whether that’s with free resources, early exclusives, discount codes, entertainment value, whatever.
Action Step: If you haven’t started a newsletter, what are you waiting for?! When I started, I used Mailchimp (which is free), but I now use Flodesk (which is paid, but I loooove). I could do an entire post on why I love Flodesk, but one reason it’s super awesome is that you don’t even need a website to get started. You can create a landing page and start collecting email addresses from day one!
If you’re interested in Flodesk, you can use this link for 50% off for your entire first year (and I get a little kickback, whoop). Regardless of platform, I cannot encourage you enough to get your newsletter started!
Have a newsletter? Great, spend a little time in January thinking about how you can add more value for your subscribers, and how to drive more of your social media followers to your newsletter.
To get people to connect with you off the app, you need to provide value on the apps.
Here are some ideas for social content in January: Sharing seasonal crafts, where you order seeds/plant/tubers, your favorite varieties of a specific plant, what you’re sowing and when/why you’re sowing it, what your planning for this season, current farm tasks, lamenting over the fact that your chickens aren’t laying eggs (and if they are, how rich you’ll be because of it), cozy winter vibes, exclusives for the upcoming season, what you’re learning!
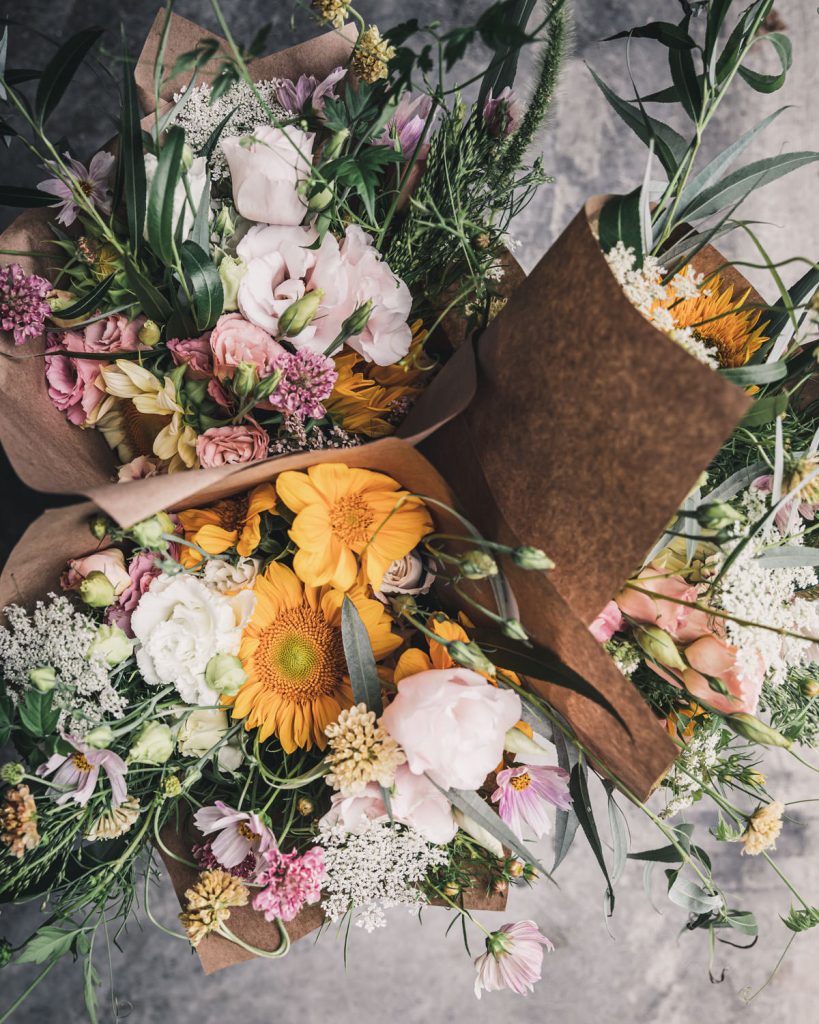
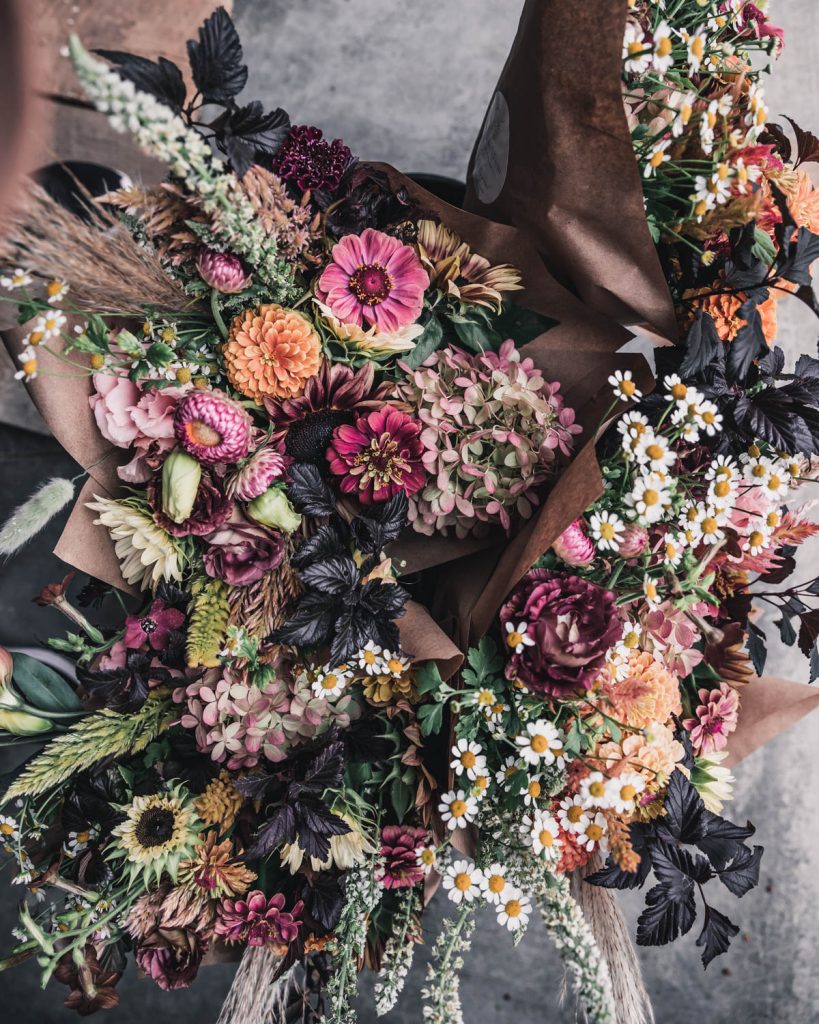
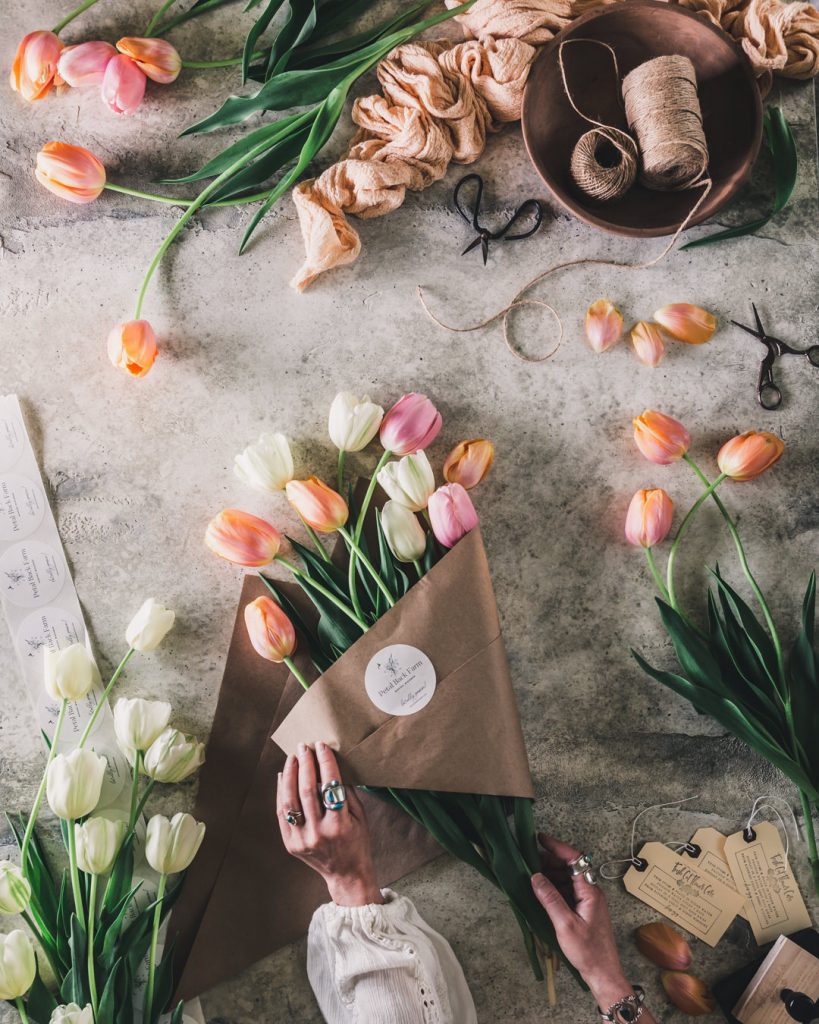
In fact, you have my permission to share ANY of the images on this post or the lisianthus post on any of your social places, as long as you mention Flower Farmer’s Year (FFY) and tag petalbackfarm (or share this link:
petalbackfarm.com/flower-farmers-year/
How about that?! I often talk about what I’m learning in my newsletter and on the gram, because I think it shows my peeps that I’m invested in improving my craft!
Writing newsletterz and social media captions: OK, I write long newsletters. I often write long captions. That’s not really necessary, but if I can offer you one piece of advice: Engage people with your photos, but write your captions how you talk to your friends (these are your social media friends, afterall). Writing captions isn’t always easy. We’ve all been there, but I gravitate towards newsletters and accounts that feel like a real person is talking to you.
Wrap Up
OK, my friend, that is IT for January. What do you think? Did you find some useful nuggets? Is there anything that’s unclear or you wish I would have covered? Or is your head spinning? No worries, this link be live until the end of February, at which point you’ll get a PDF copy, so you can always refer back it. Tip: use the find shortcut (Ctrl+F on a PC or Command+F on a Mac to search for any word or term).
Have any questions or something you want to share with me or others? I know I say this ad nauseam, but I truly believe in the power of the collective and that we all have something unique and powerful to share, so please leave a question or share a comment below. We’re all better for it, and I thank you in advance!
Cheers pal!


I just want to say a huge thank you for all you have shared. Absolutely just what I need. Thank you so much. I already can’t wait for next months!
I personally would be interested in learning more about the different business models and if you succession plant.
I can’t honestly thank you enough. Everything you have shared for Jan has been so useful when sitting here trying to plan. You have made it seem so much clearer. x
Hi, Zoe:
I’m so so glad to hear it, thank you for sharing with me 🙂
Also, great questions!!
I’ll dive deeper on each of our business models in future months (things like why we chose them, logistics, how it works on our website, the systems we use, wedding a la cartes, and so forth).
Succession planting, I think I’ll add a section in January’s planning that’s more flushed out, but here’s an off the cuff answer: We do succession plant, but I try to keep it simple. Hopefully I can explain it in a clear way below.
When I say we succession plant, I simply mean that we stagger plantings of certain crops in order to have a longer harvest window (and this is outlined in our sowing schedule). That said, for me, this is really an afterthought that I only consider after determining what flowers to grow for each season.
My first year, I was overly obsessed with nailing down succession planting because I thought if I didn’t, I wouldn’t have a steady supply of flowers. I also made my field plan overly complex by trying to time things perfectly.
In reality, there are so many factors that affect timing. Now, I focus my energy first on my flowers by season, then I consider successions. The reason being is that as long as I know I have flowers for each season, the successions become a little easier to manage and I try and limit successions to my must-haves.
I also don’t get too bogged down by flipping beds. Instead, I succession plant into an open bed versus trying to follow a crop for *most* successions. So, if I have a 100-foot row of sunflowers, I am sowing 25 feet of that bed on May 1, 25 feet on May 10, 25 feet on May 20, and 25 feet on May 30.
I think flipping beds sometimes gets confused with succession planting. In our short growing season, we only flip a small amount of beds. Flipping a bed means you have one crop and then once it’s done, you follow it with another crop. This is one way to succession plant, but it can overcomplicate things when you are just starting out OR have a short growing season.
If you have the space, it is *much* easier to succession plant into an open bed (i.e., not have to time the succession to follow an existing crop). When a bed is done for the season, it gets to rest. For us, this means our beds are at various stages (some planted, some empty and waiting for a succession, and some done and resting).
The rare exception would be the spring flowers. For example, I know that tulips are going to be petered out by the end of May. I usually will follow a tulip bed with sunflower successions (in my plan, I write it as: tulips, followed by sunflowers).
I hope this helps!
Maggie
Thank you for all this excellent and detailed information. The seed sowing & planning Google sheet is super useful and I just finished plugging in all my crops & dates. Thank you for sharing this tool!! I have an excel sheet I have been using but have too much info in it that it was becoming difficult to use effectively. Yours is much easier and cleaner! Anyways, I am looking forward to to being a FFY member this year and learning from you!
Shannon, thank you for sharing with me! I am so so happy to read this and glad you found it helpful. Cheers to our collective best season yet 🙂
Thank you times a million for all of the information you have kindly shared!!! You have really helped me wrap my brain around planning and planting out my farm. I would be interested in learning more about your seed starting set up. We start our seeds inside and are worried the lights we are using may not be right. Thanks again!
Hello! You are so very welcome, thank you for sharing with me!! I am going to go much deeper on seed starting in February, including our setup, but I also have a pretty in-depth blog post that can be found here. We also start our seeds indoors. We use Husky shelving from Home Depot, and for lighting, we just use regular old shop lights (4-foot wide, two-light shop fixtures, that come with chains/S-hooks for hanging, with either fluorescent or LED tube light bulbs.). You do NOT need fancy grow lights, but you do need a setup where the lights can get close to the plants (just a few inches above), which is why we like the shop lights because they can be hung from anything that will hold a hook. Some growers get really specific with light temperatures (opting for a mixture of warm and cool), but I find that anything within a range of 4,000–6,000K has a suitable spectrum for starting seedlings that will ultimately live outside. If you’re like, say what? The light bulbs will have this information on the package (i.e., they’ll say something like T8 Tube Light Bulb Natural Daylight 5000K). OK, hope that helps, but we’ll definitely dig deeper on seed starting Feb (new posts will go live mid-month).
Thanks so much! I look forward to it!!!