If you haven’t already done so, please read the FFY Introduction.
February Overview
Here’s a breakdown of what we’re covering in February:
- Personality Exercises
- Starting Seeds Indoors
- Soaking & Presprouting Ranunculus and Anemones
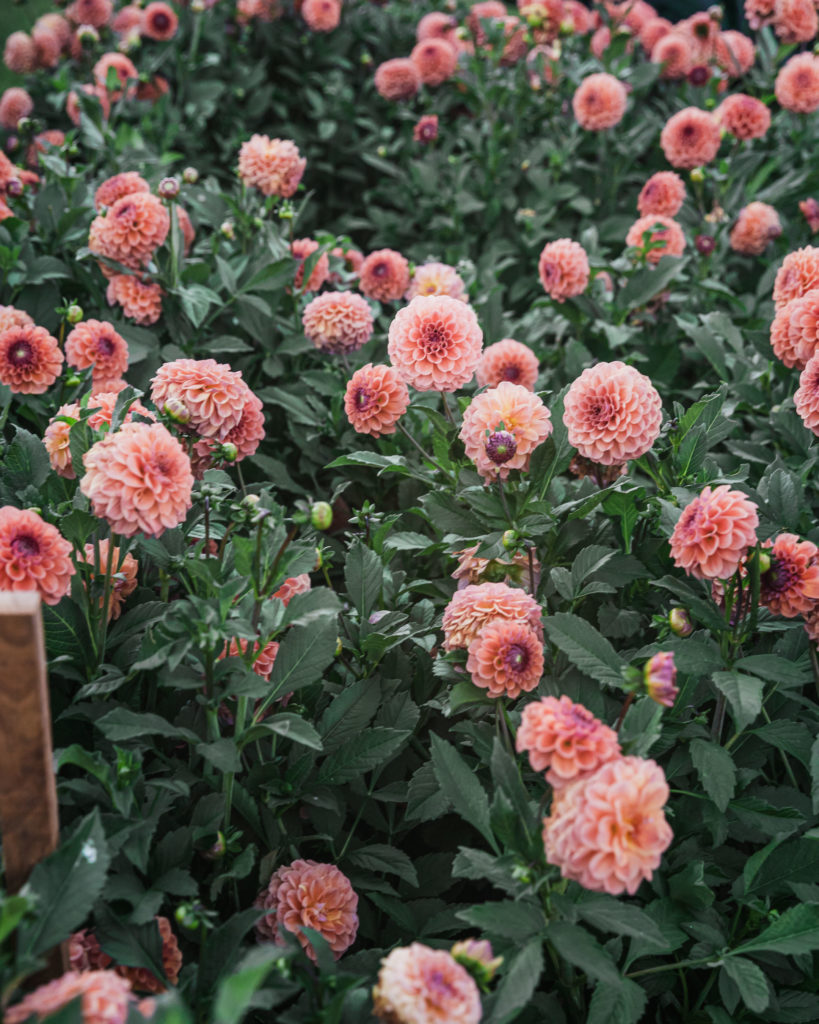
- Dahlias (Dividing & Cuttings)
- Inventory
- Ordering
- Sowing
- High Tunnel Tasks
- Websites
Personality Exercises
OK, we are starting off February much like January: with more exercises! These are all about getting to know ourselves better. Why? Because when it comes to growing an epic garden or running a profitable business, the more we know about ourselves, the better we can set ourselves up for success. Winter is a wonderful time for some inward reflection.
All of these exercises can help us better understand our strengths, weaknesses, and deeper motivations. This deeper knowing can provide clarity when making business decisions and discernment in times of uncertainty.
This might make you excited or this might make you roll your eyes. If you’re excited, hell yes, let’s keep going. If you maybe-sorta-kinda rolled your eyes, know that I am you.
I used to be in the “eye roll” category until I was basically forced to do one of these exercises and then realized how helpful they were to me (and now my business). Now, I jump on the opportunity when one comes my way. So, I am going to encourage you not to skip these. At least pick one.
Bonus: most of these are free!
In order, these go from most corporate/scientific to more wooey. No need to do all of them, but I have found tremendous value in *each* one, so I’m including all of them. I like to think of myself as someone who is open-minded to the more “out-there” theories; however, I like to tie them together with more-traditionally-accepted ideas.
MBTI
MBTI/NERIS Personality Test results are described as “freakishly accurate” with users reporting over 91% accuracy rate. Pretty crazy with over 700+ million takers, especially since the assessment only takes 10 minutes (P.S., it’s free).
Based on Myers-Briggs typology/Jungian theory, it can give you great insight into your strengths, weaknesses, and tendencies. When done with a team, you’ll learn what really drives, inspires, and worries different personality types, helping you build more meaningful relationships.
Early on in my career, this an exercise I had to take when joining a new team (a new job, team, and boss I ended up loving). At the time, I rolled my eyes, but it ended up being very impactful for me.
Clifton Strengths
This one looks super corny at first, but it’s actually pretty cool. Used by over 90% of Fortune 500 Companies, the State Department, Pentagon, Google, Amazon, Stanford, Harvard, Navy Seals, TESLA, NASA, to name a few, so I guess you could say a few others find it valuable too.
What I love most about Clifton Strengths (and have now used with multiple teams) is that the core principle is about focusing on strengths instead of weaknesses. Too often, we are trying to improve our weaknesses, but Don Clifton believed this wasn’t very effective.
After intense study on human development, Clifton found that all he could find was focused on what was wrong with people instead of what was right with people. He believes that improving weaknesses does not take us far, whereas improving on our strengths can maximize our infinite potential.
This was definitely an a-ha moment for me! In both life and business, I am now way-more focused on maximizing my strengths instead of beating myself up for and trying to improve my weaknesses. Now, I either asking for help or outsource my weaknesses.
When it comes to business, this is all about tailoring your business to maximize your strengths. If you have a team (or hope to have a team), the idea is to maximize the potential of others whilst building teams that have strengths in the four core areas.
This assessment is paid, but you can buy the book on Amazon for around $20 and get a code for the exam. It takes about 1 hour.
Personal Values Assessment
I work for a college and this is an assessment we were asked to take in Academic Affairs. Having a clear understanding of your values can help you make better choices. Value-based choices are equally important for big and small decisions. This is another exercise that I first rolled my eyes at, but ended up really resonating with me. I mean, of course, they are *my personal values* afterall. However, I think having them clearly defined helps, because I continuously come back to them when making decisions.
Enneagram/RHETI
I feel like I’m constantly hearing about the Enneagram these days, but this was a test I had to take for a class when getting my second degree in health and wellness. This is another one that once you take it, you totally feel seen. It’s a system of personality typing that describes patterns in how people interpret the world and manage their emotions. This one costs $12 and takes about 15 minutes.
Gene Keys
OK, this one might be a little out there for some of you, so please take it or leave it. The Gene Keys are not based on an assessment, but instead the exact date, time and location of your birth. It’s based on astrology, the Chinese I Ching, with some ties to Human Design.
I know astrology sounds pretty wooey to some. And maybe it is. But it’s always perplexed me that we fully accept that the position of the sun, moon, and earth directly impacts tidal waves, but we find it “wooey” that astrology (which is simply theories based on celestial positions) could have an impact on us.
Anyway, the core of the Gene Keys is about contemplation. It’s a synthesis of practical wisdom to help guide you to a deeper understanding of yourself and your true potential. What I find fascinating is how the ones above (which were based on personal, subjective reporting/evaluating) align with the my results from the gene keys (which were based on objective facts: the date/time/location of birth).
If you are interested in a journey of contemplation, you can get your profile for free, but the book is also a really a fascinating read.
If you can find the time to explore any or all of these, I hope they give you a little more insight and clarity into your next season of business and life! OK, onto the business of flower farming in February 🙂
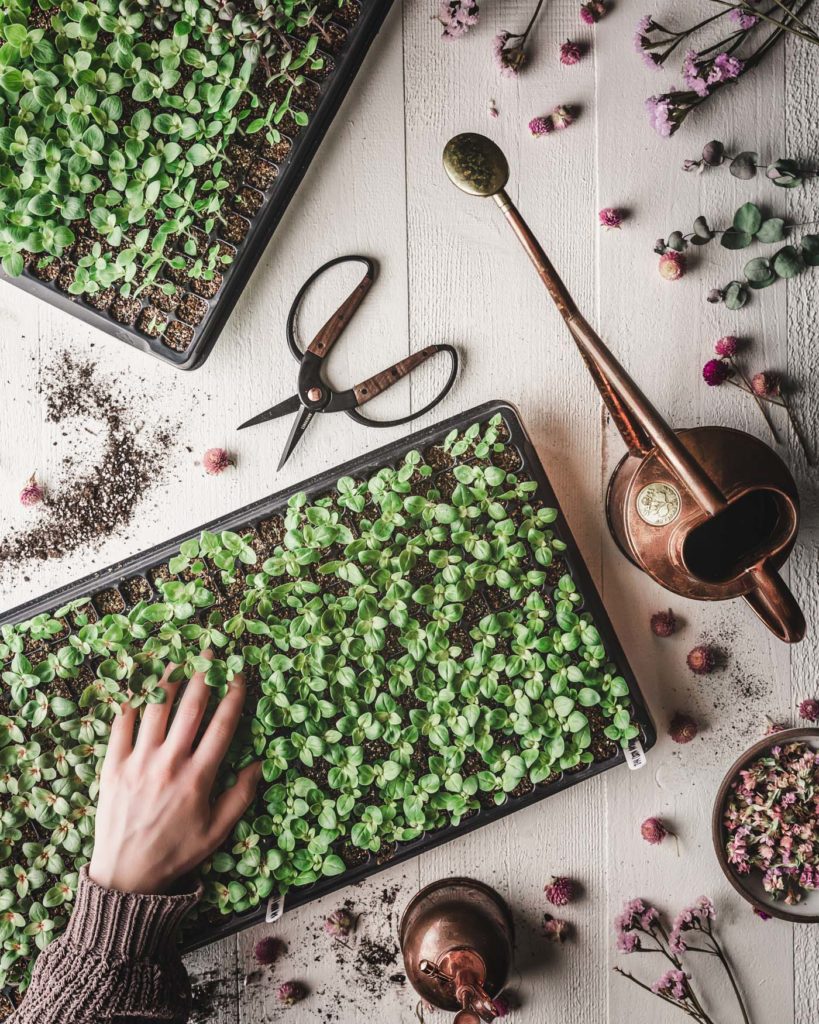
Starting Seeds Indoors
February is when starting seeds really starts to take off. And guess what? You don’t need a greenhouse, fancy grow lights, or even a ton of space! We’ve been starting seeds in our basement for years with nothing more than some dirt, pots, and shop lights. In fact, the first year on the farm, our basement was under constructions, so I started all the seedlings in our master bedroom, HA!
First, why would you even want to start seeds indoors? Some of the benefits include getting a jump start on the season, choosing from a wider selection of varieties, filling up your farm/garden with more plants for less money, and having your hands in the dirt in the dead of winter!
There is SO much information out there regarding starting seeds indoors, and there are a lot of different ways to do it. It can feel overwhelming in theory, but it’s really quite simple in practice.
Before we talk how to start seeds, you’ll need to gather supplies. I like to break seed-starting supplies up into the Basics and the Extras. The Basics are all you really need, but the Extras are some nice-to-haves if you’re ready to invest a little more into your operation. There are a few links below, but I also have a checklist that lists to items with more links, which you can find here (I recently updated this sheet because some of the sites changed their links, or I changed where we got these items).
Supplies: The Basics
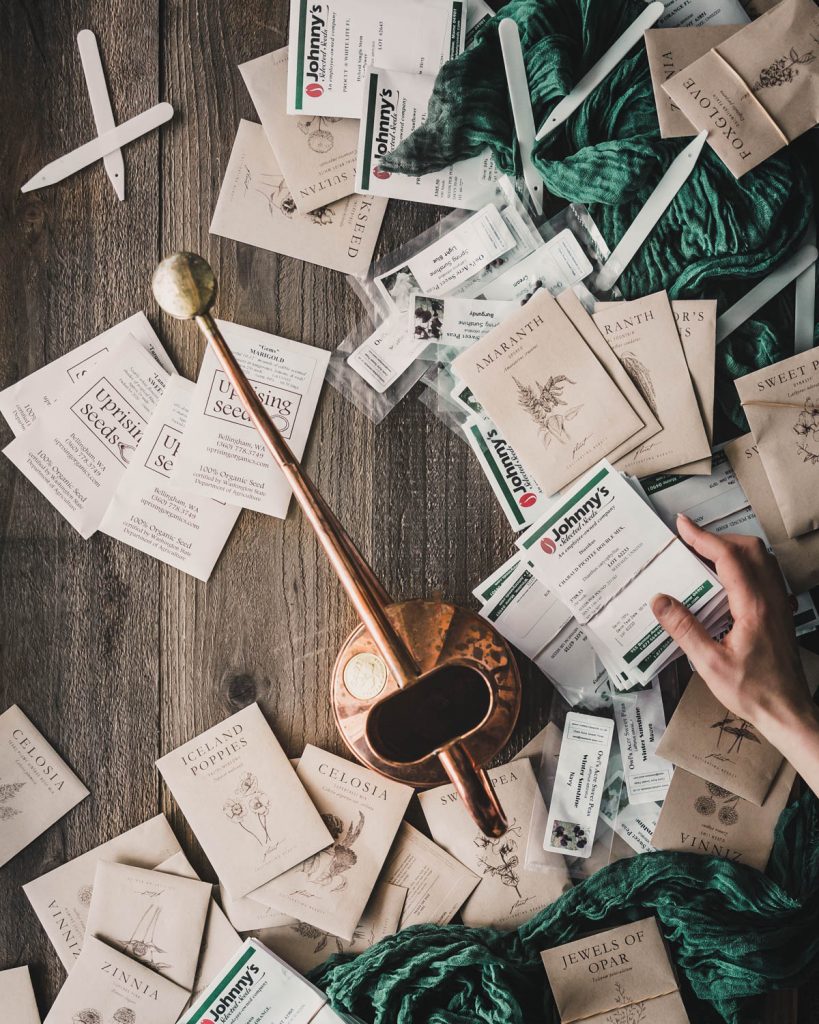
SEEDS
This might sound obvious, but you’ll need seeds. If you’re not sure where to start, I buy the majority of our seeds for the farm from Johnny’s Selected Seeds or Ball. While you will need to create a wholesale account with Ball, you can shop retail at Johnny’s (though I’d recommend setting up a wholesale account with them to avoid sales tax).
I also have a blog post with my favorite places to order seeds.
FLATS & POTS
When I first started out, I totally and unnecessarily stressed out about trays and pots. What do I use? Where do I get them? Which size? What material–Fabric? Plastic? Paper? Cowpot? Jiffy? No pot? I was lost in an an abyss of internet options.
If you enjoy going down internet rabbit holes, this is your topic. People use everything from recycled toilet paper rolls to egg shells to newspaper to nothing at all (soil blocks). There’s something for everyone. If you do not enjoy internet rabbit holes, know that you can pretty much use anything that holds dirt and has drainage, and you’ll grow great plants.
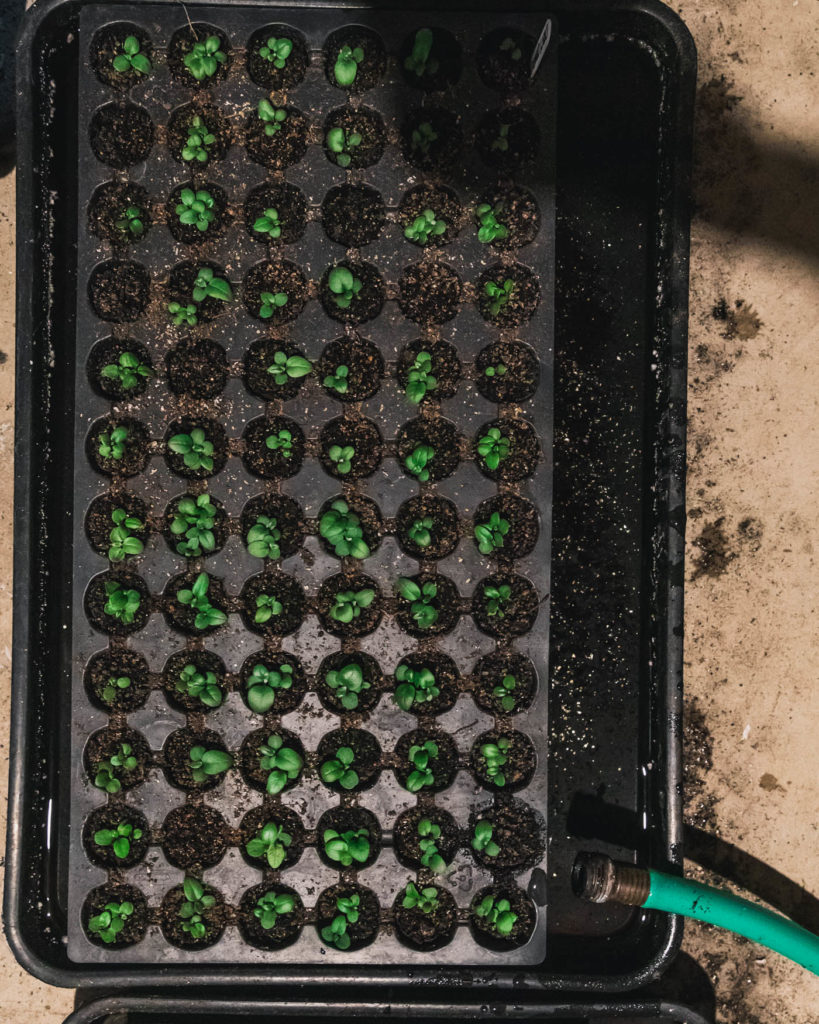
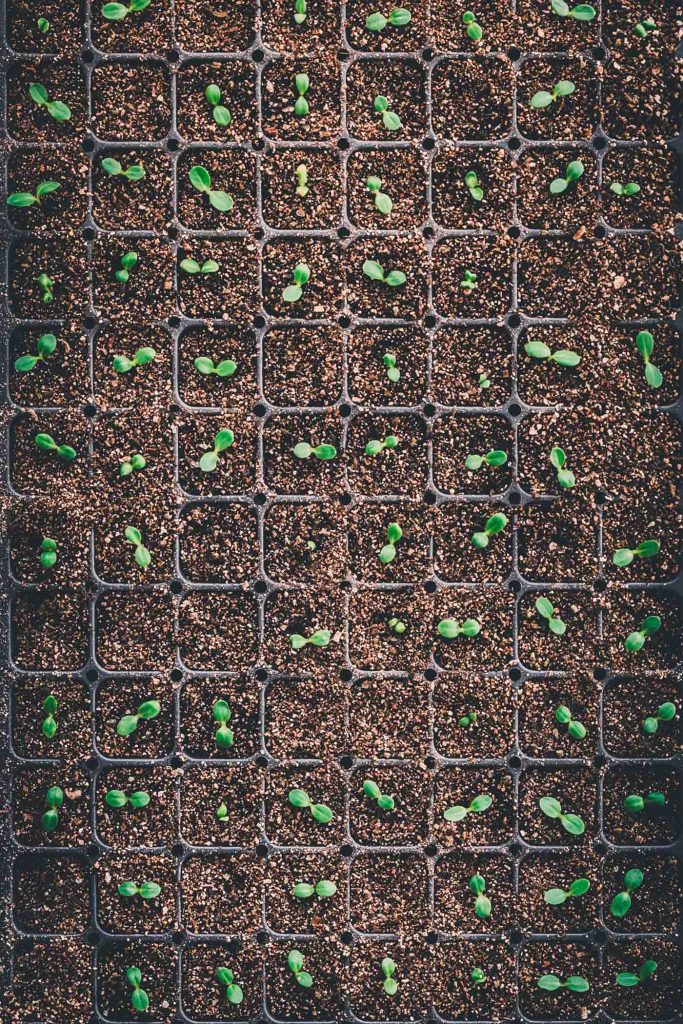
We prefer to use greenhouse plug flats (what I sometimes refer to as cell trays) and pots. They’re economical, uniform (i.e., more efficient), durable, reusable, and meant for growing great seedlings! We start almost everything in plug fats/cell trays.
We grow almost everything in either 72-cell trays or 128-cell trays. We use deep 50-cell trays for sweet peas, other vines, and pre-sprouting ranunculus and anemones (there is a whole section below about soaking/pre-sprouting corms). For plants we grow on a smaller scale, we use 6-cell deep inserts (mostly, my vegetables, but I figured it was worth calling out).
For potting up, we use 4-inch or 6-inch coex pots. Over the years, we’ve leaned heavily toward potting up as few plants as possible because of the labor/resources involved. *Most* seedlings go directly from a 72- or 128-cell tray into the ground.
The only plants we regularly pot up are: eucalyptus, peppers, and tomatoes. I may pot up dahlia cuttings from 128 to 72 (more on dahlia cuttings below). I may pot up perennials like delphinium and eryngium to 50-cell trays. I plan to experiment potting up an early crop of lisianthus from 210s to 72s this year (but if you were here for January’s Plant Profile, you know that I typically directly transplant lisianthus as little as 210s).
Every winter, we take a road trip to Green Grove Supply, our local supplier, to stock up on a number of supplies. Before we purchased here, I ordered the same items through Greenhouse Megastore. They have a wide selection for all your growing needs (and often have free shipping–score!).
If you’re interested in soil blocks, there are a lot of advantages (from root pruning to conserving on space to limiting plastics), and it is really great for seedlings! I’m just not patient enough (yet). While I fuss over my seedlings early on, by the time April hits, there are thousands that need to be taken care of (on top of harvesting tulips), and I can barely keep up overhead watering (I’m almost too aggressive for actual trays, ha)! We’ve had our trays for yearssss. Once it’s time to throw in the towel, maybe I’ll have found some zen and will give soil blocking a real go. If you’re interested it, I’d check out Blossom and Branch Farm as she is super knowledgeable on the topic.
TRAYS & DOMES
Regardless of what you use for pots, you’ll want trays for a variety of reasons: bottom watering, collecting extra drainage, and carrying flats and pots. If you want to increase your germination rate, you’ll also want to increase humidity. You can accomplish this with something as simple as covering pots with plastic wrap, but I prefer using humidity domes over my trays.
While we have regular 1020 flats/trays for holding the cells, I prefer heavier-duty larger trays for bottom watering. I don’t like bottom watering in the holding trays because I feel like the water just sits there. When seedlings are young, I bottom water in larger trays like these because the cell trays can sit flat and soak up water. Once they’re older, I use a watering wand.

Water
Speaking of water, you obviously need water for your seedlings, but you need to consider *how* you’re going to water them indoors.
Currently, I do this in our basement. We have a utility room in our basement that has a concrete floor with a drain. Matt hooked up a hose with a wand, so I can water there without worrying too much about it. It’s not fancy, but igets the job done!
When the seedlings were in our master bedroom, it was a whole different story. We put down plastic, followed by cardboard, followed by the shelving. I either bottom watered or watered by hand very carefully with a watering can with a small spout (not rain spout).
It was not ideal, and watering felt like a constant battle, but sometimes you just need to work with what you got! I saw a gal post on instagram how she carries 5 gallons of water down to her basement. I totally get it! Our first year, I had to water the FIELD by hand before the water lines were installed. Not ideal. Water is necessary for plants, and a good watering plan is key.
SOILLESS GROWING MEDIA
Once you have your pots and trays, you need to fill them with growing media. When I first started out, the term “soilless mix” really threw me for a loop. Hopefully, I can save you some of the same confusion.
Soilless growing media, like peat moss, perlite, vermiculite, and/or coconut coir, are combined together as a soilless mix for starting seeds. While you can certainly use the soil in your yard, a soilless mix is preferable because it’s generally cleaner of harmful bacteria and fungi, lighter in weight, and retains moisture, while also improving drainage.
You can buy soilless growing media separately and mix your own, but I prefer to leave that to the professionals. When I first started growing, I scoured the internet and agonized over what was “thee best” soilless mix. I’ve tried everything from Johnny’s 512, a handful of the Pro-Mixes, Lambert Organic, The Seed Catapult, Sungro Sunshine Mix #4, Sungro Sunshine Mix #1, and on and on. I honestly can’t say that I notice a huge difference in plant quality when all is said and done.
Now, I don’t stress it and stick to whatever I can get locally (right now, Sungro), and I hope that gives you licensing to not stress it either (but I mean, maybe you’re not as nuts as me, probably). Buying local is generally much cheaper than shipping a large bag of dirt. Reach out to your local nursery or garden store and ask what they have for starting seeds.
If you can’t find anything local, check out the ones I listed above online. Unless you are sowing into super small cell trays or plugs (288, etc.), any of these work. If you’re working with super small cells, see “Germination Mixture” in the Extras.
SPACE TO FILL TRAYS
While you don’t need anything fancy, you do need a space to fill trays with your growing medium. My super official space is backing the gator into the garage and using the tailgate as my “table” for my mixing tray. I *love* this mixing tray from Greenhouse Megastore for moistening soilless mix and filling trays/pots. This isolates the majority of the mess to our garage, but I do sow seeds at our dining room table 🙂
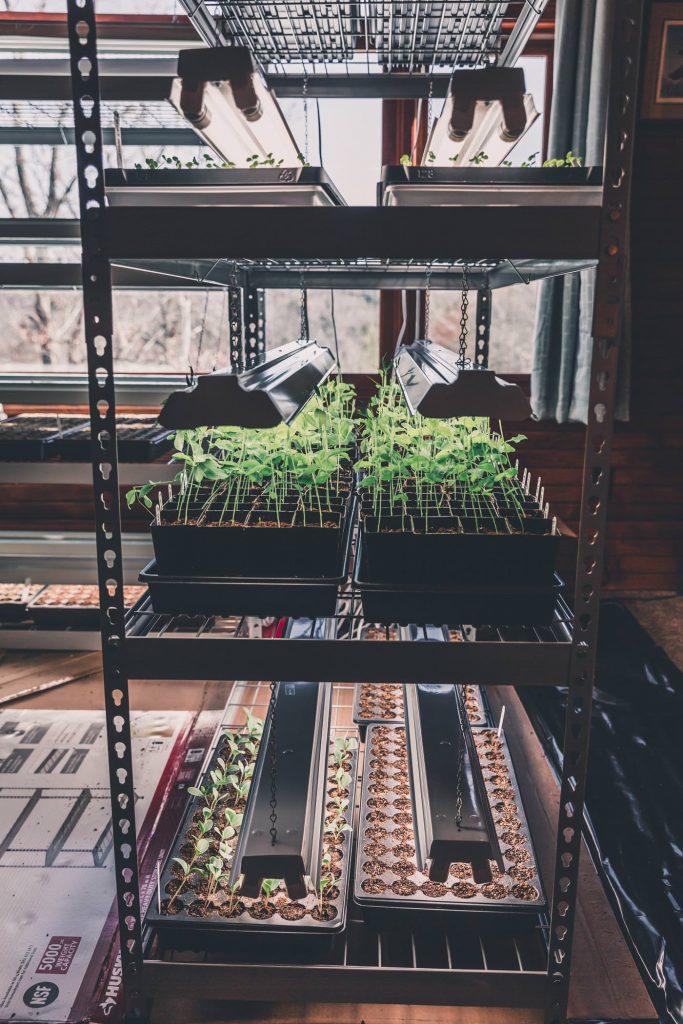
SHOP LIGHT SETUP
Once seeds sprout, they need bright light to stimulate growth. Unfortunately, the natural light in most homes is not strong enough. Fortunately, you don’t need fancy or expensive grow lights to get the job done. Regular fluorescent or LED lights work great, as long as you’re able to hover them a few inches over the seedlings.
We use 4-foot wide, two-light shop fixtures, that come with chains/S-hooks for hanging, with either fluorescent or LED tube light bulbs. The reason for both is simply because of the type of fixture that was on sale at the time. Matt scored some fluorescent shop light fixtures on sale for like $11 at Menards in 2019! Some fixtures are only compatible with certain bulbs, so make sure to read the packaging and only use the correct bulbs. I say this as someone who has shattered an LED bulb by putting it in a fluorescent fixture (facepalm).
Some growers get really specific with light temperatures (opting for a mixture of warm and cool). I find that anything within a range of 4,000–6,000K has a suitable spectrum for starting seedlings that will ultimately live outside. So, I buy whatever they have on sale in that range. If you’re like, say what? The light bulbs will have this information on the package (i.e., they’ll say something like T8 Tube Light Bulb Natural Daylight 5000K).
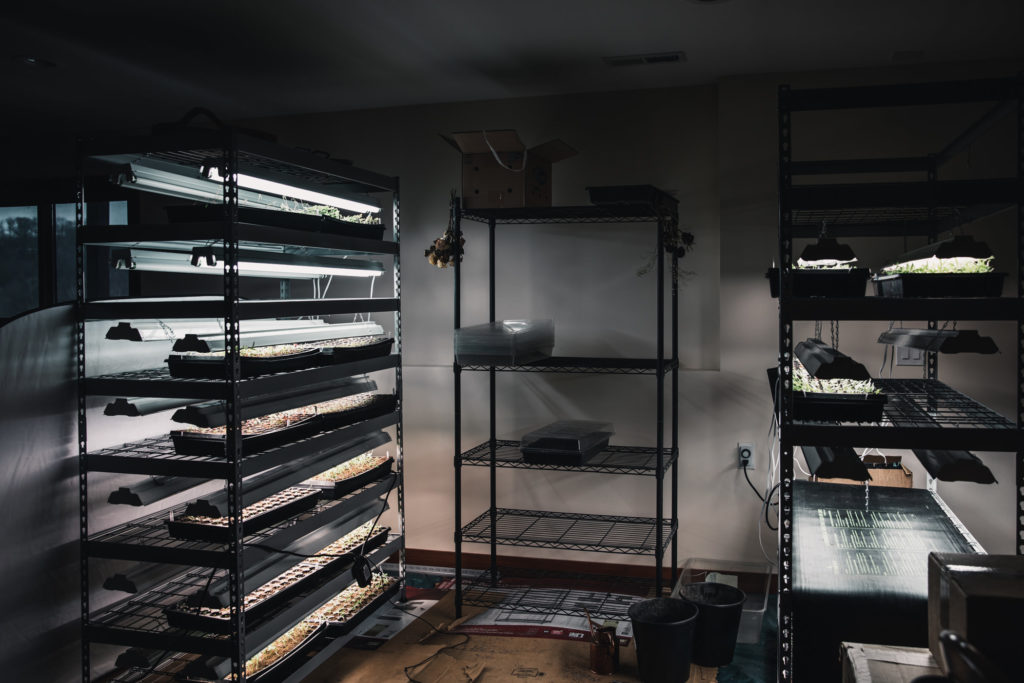
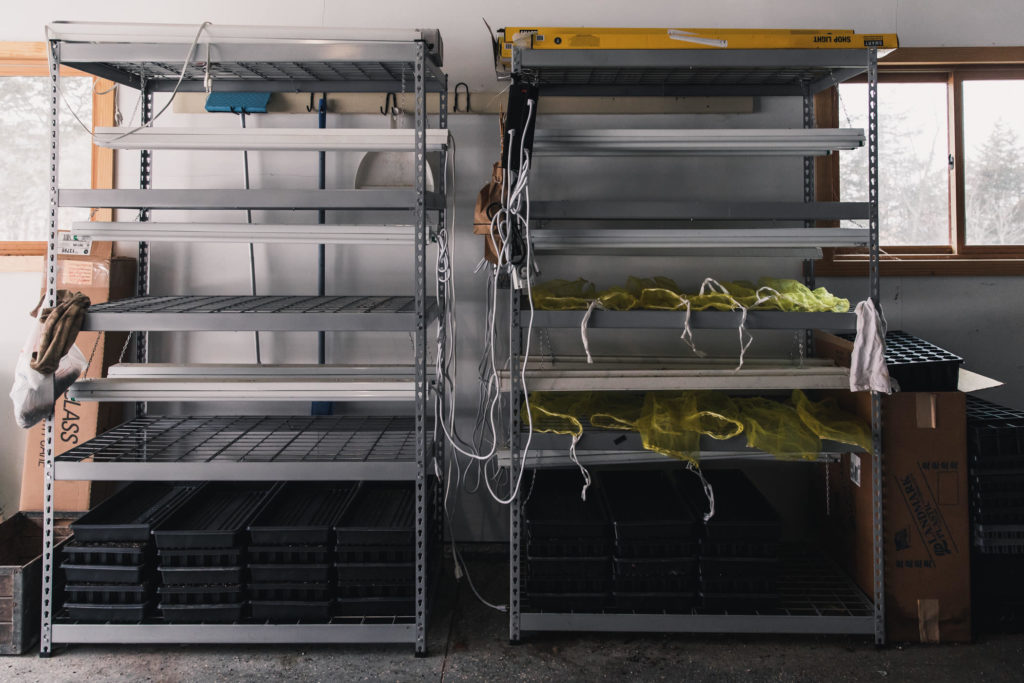
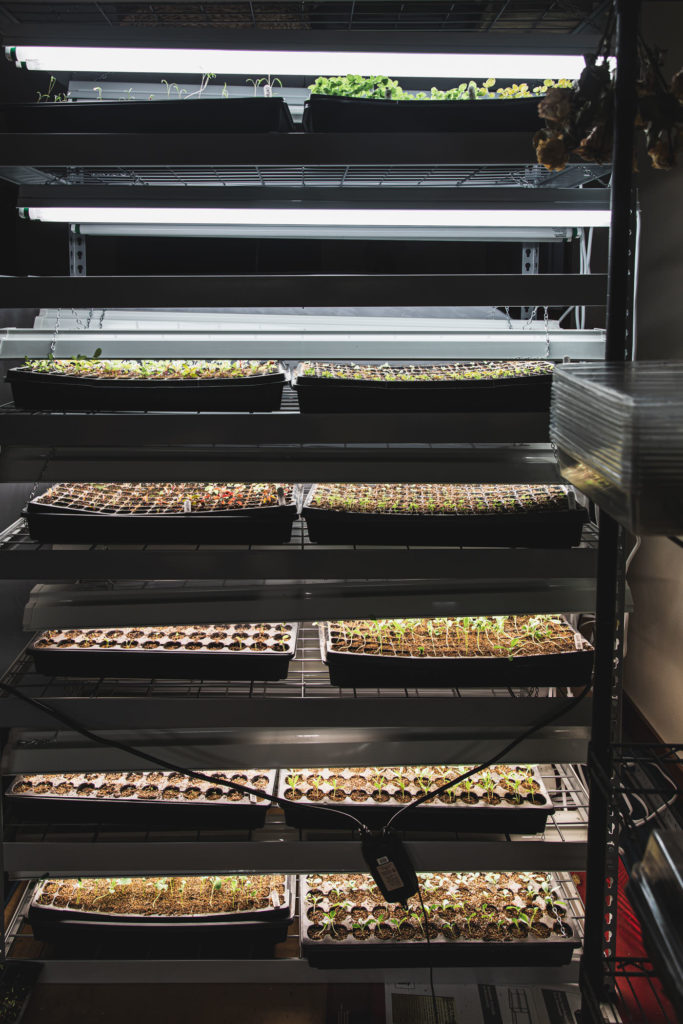
Once sprouted, the seedlings need to be just a few inches below the lights. To accomplish this, we rig up 4-foot wide shelving units with the shop lights. We snag the 4-foot Husky shelves from Home Depot whenever they go on sale.
The reason we like these shelves is for a couple reasons. Reason one is that you can combine units to create narrower spacing between shelves. So, essentially, we’ll take three shelving units and combine them into two units with narrower spacing between the shelves. Basically, we’re getting three shelf-units worth of space in the footprint of two. The other reason we like them is because they’re heavy duty, so we can use them in the garage or pole shed afterward.
Once assembled, we place trays on the shelves below and hang the shop lights from the shelf above. The chains/S-hooks that came with the shop lights are easily adjusted to the height of the plants as they grow. We put our lights on timers for 14–16 hours per day. How this works logistically: timer plugs into wall, power strip plugs into timer, lights plug into power strip.
We have two separate seedling setups. One in our basement, which is warm (68F and even warmer under the lights). The other setup is in our garage, which stays much cooler, but above freezing. Right now, it’s hovering between 40–50F. The reason for this is that some seedlings like warmer temperatures, while others prefer cooler temperatures. And some seedlings, like lisianthus, have major issues if they are exposed to high temperatures at seedling stage.
So, we sprout all seeds in the basement, but once sprouted, some seedlings are moved to the garage if they prefer cooler temps. Most reliable seed companies will include this information on their seed packets (and this is what I refer to). Some of the most important ones to move to cool temperatures soon after emergence are lisianthus and sweet peas. At some point, though, all seedlings are moved to the garage to begin hardening off (and because I run out of space!).
Speaking of running out of space, it’s OK, it happens. By the time we no longer have space for all the seedlings under light, it’s usually mild enough to start “hardening off” which just means introducing them slowly to the elements (more on that below). If it’s not mild enough, you can rotate trays under lights if you run out of space.


LABELS
Don’t forget to label your seedlings! You might think you’ll remember by using some clever device like planting them in alphabetical order (ahem, been there), but it’s easy to mix things up in the whirlwind of spring. I’ve used everything from painter’s tape, popsicle sticks, and plastic labels. Use whatever gets the job done. Tip: use pencil for labels! Sometimes, I just use whatever is around, but pencils, contrary to what you might think, really work!
Supplies: The Extras
Although the basics are all you really need, here are some extras. If this feels like a lot of information, feel free to skip it. But if you’re up for more, I find these extras are really worth it.
HEAT MAT & THERMOSTAT
As long as you’re able to place your trays in an area that stays above 65F, supplemental heat may not be necessary. However, if your setup is somewhere cooler, a heat mat and thermostat might be necessary (at the very least, helpful). A little extra heat usually speeds up germination, especially for heat lovers like zinnias and basil.
Keep in mind that some plants don’t like heat, but their seed packets should indicate optimum temperatures for germination and growing on. I only use heat mats for germination. Once seeds sprout, I remove them from the heat mats.
GERMINATION MIXTURE
For smaller seeds and plug flats, like 288, a finely-textured medium is ideal. These are usually made up of the same material as your typical soilless mix, but they’re screened/sifted to produce a finer texture that’s dreamy to work with. Companies typically label these for germination. I used to start our snapdragons in 288s, using Sungro’s Germination mix (which I love, it’s so fine!), but I just don’t love babysitting the 288s for moisture. I’d rather just start in a 128 (but certainly 288s are nice for space).
MYCORRHIZAL FUNGI INOCULANT
The term mycorrhizae refers to a group of fungi that form a symbiotic relationship with a plant by attaching to its roots. While attached, they send out a vast network of hairlike structures called hyphae into the soil. This forms an enhanced, absorptive surface area, which boosts a plant’s ability to take up water and nutrients.
Almost all land plants form symbiotic associations with mycorrhizal fungi, and many plant species depend on them for growth and survival. While most soils contain mycorrhizal fungi, they are often very low, especially in depleted soils like our old, conventional crop field. Soil fertility is our number one challenge here at the farm.
Because of this beneficial relationship, many growing media producers include mycorrhizae in their growing mixes. However, if they do not, you can purchase a mycorrhizal fungi inoculant separately and add it to your soilless mix when filling your trays.
For most people, this step is not necessary to grow great plants. Mycorrhizal fungi might already be in your soilless mix and are very likely already in your soil on some level. Because we’re dealing with soil that’s seriously devoid of life, we want to increase nutrient/water uptake and biodiversity wherever we can.
The soilless mixes we’re able to get locally don’t always have mycorrhizae, but we are able to get the inoculant locally, so we do! If you want to include this extra, choose an inoculant that has at least some endomycorrhizal fungi species, as more plants utilize endo vs ectomycorrhizal fungi.
VERMICULITE
You may recall that vermiculite is one of the soilless mediums typically found in soilless mixes. So, why buy it separately?
After sowing seeds, I find it easier to cover them with vermiculite versus the soilless mix. It also holds moisture and is easier for the seed to sprout through due to its light texture, aiding in germination. Totally not necessary, but definitely nice to have. We also mix it with wildflower seeds for broadcasting into the pollinator prairie. We also use it for storing dahlia tubers!
LIQUID SEAWEED AND FISH EMULSION
Once seedlings get bigger, they enjoy some nutrients. According to the label instructions, water seedlings with a fish/seaweed emulsion once per week. This can be kind of smelly, ha. Don’t say I didn’t warn you. I typically wait to do this until the seedlings are moved to the garage, but not always, ha.
How To Start Seeds Indoors: Tips & Tricks
GENERAL GUIDELINES
As a rule of thumb, plant seeds twice as deep as they are big. The surrounding air should be at least 65F or above. They like to be consistently moist but not drenched. Bottom watering (placing seed trays in a bottom tray with water for about a half hour to soak up) instead of overhead watering prevents newly-sown seeds from washing away.
RULES ARE MEANT TO BE BROKEN
Although these general guidelines work for most seeds, these rules don’t always apply. Some seeds should not be covered because they require light to germinate. Some seeds, like hot peppers, prefer a really warm environment; while others, like Bells of Ireland, will speed up germination if they’re introduced to cold prior to sowing.
Reliable seed companies usually include this information on the seed packets, so be sure to read them prior to sowing. I literally do this before I sow every new variety. If the seed packet doesn’t have the information, I consult Johnny’s. This is easier for me than trying to remember which plants like what.
Seed packets also typically list germination rates. We aim for one to two seeds per cell, but we’ll add more if germination rates are low for particular varieties. Johnny’s site has growing and germination info with each listing. As I’m sure you figured out, I’m constantly referring back to their website!
SEEDS THAT BENEFIT FROM COLD TREATMENT
As noted, some seeds benefit from cold treatment. While you should consult your seed packets, there are a handful that I keep in the freezer for this reason: Ammi, Bachelor Button, Bells of Ireland, Bupluerum, Dara, Delphinium, Iceland Poppy, Larkspur, Nigella, Orlaya.
DEALING WITH SUPER TINY SEEDS
Finally, some seeds are super small. We’re talking the size of a grain of sand here. There are a few ways to deal with this.
You can broadcast in an open tray instead of cells (we do this for onions). For others, like snapdragons and poppies, many people have success using a toothpick (and licking it or dipping it in water as a way to pick up the seed on the end of the toothpick). I’ll be honest, that way drives me nuts.
Matt came up with the best way we’ve found yet to deal with small seeds. Take a regular, old Post-It Note (the kind that has a sticky end). Fold it in half so the sticky ends stick together–this is where you’ll hold it.
Then, while holding the sticky end together, open the non-sticky sides, so that the crease in the non-sticky end serves as a mini seeder. Pour seeds in this open crease, and use a toothpick (or something similar) to scoot the seeds down the crease and into the tray. Kind of silly, but it’s faster than trying to pick each one up with a toothpick for us.
Another alternative are these seed-sowing tools, but I honestly prefer the Post-It Note, HA!
Now that we’ve broken down all the supplies, you’ll find printable instructions below.


How to Start Seeds Indoors
Materials
- Seeds
- Soilless mix
- Plug flats and/or cell inserts
- Trays
- Domes
- Labels
- Shop-light setup
- Liquid Seaweed and Fish Emulsion
- Mycorrhizal Fungi Inoculant, optional
- Fine Vermiculite, optional
- Heat mat, optional
- Thermostat, optional
Instructions
- Before planting, read the back of seed packet for special considerations (germination rate, depth, temperature, light, etc.).
- Moisten soilless mix so that it’s damp but not sopping wet. When you squeeze it, it should retain its shape, but not drip, and break apart easily when poked. Mix in Mycorrhizal Fungi Inoculant at this time (optional).
- Fill plug flat or cell inserts with soilless mix. Once full, pick up and tap on the table/ground to settle the mix in. You can use something long and flat, like a wooden stake, to skim extra dirt off the top if necessary.
- While the soilless mix settles in, add your label(s).
- If seeds are larger, poke a hole in each cell. In general, plant seeds twice as deep as they are big. Super-small seeds can be sown right on the surface.
- Cover with soilless mix or a dusting of fine vermiculite.
- Fill an empty tray with water and set the plug fat or cell insert in the tray, so the cells can soak up water from the bottom. Remove once evenly moist (half hour or so).
- Place in an empty tray and cover with a humidity dome.
- Place tray in warm room that stays above 65F or on a heat mat with the thermostat set to 70F (or recommended temperature on seed packet).
- Check seeds daily, opening domes to prevent too much moisture. If soilless mix dries out, repeat bottom watering.
- Once 75% seeds have sprouted, remove dome from tray and remove tray from heat mat (if using). Place under shop lights set on a timer for 14–16 hours per day. Lights should be directly over the seedlings, just a couple inches above them. Raise the lights as the seedlings grow so they maintain this distance.
- Check seedlings daily, they can dry out quick! Water when necessary but avoid over-watering (media should not be soggy).
- As seedlings grow, they benefit from a boost of nutrients. According to the label instructions, add the recommended amount of fish/seaweed emulsion to your watering can, and drench seedlings.
- Once seedlings begin to outgrow their trays, either pot them up or plant them outside (if the weather allows). Before planting outside, seedlings should be “hardened off” in order to acclimate to outdoor weather conditions and avoid transplant shock. Set trays outdoors, starting with smaller increments and increasing time as you go. Pay attention to weather conditions and keep in mind that the soilless media will dry out quicker than when inside in mild conditions.
- Once weather allows, transplant seedlings in their final spot, watering in deeply and nurtured for the first few weeks as they establish.
Notes
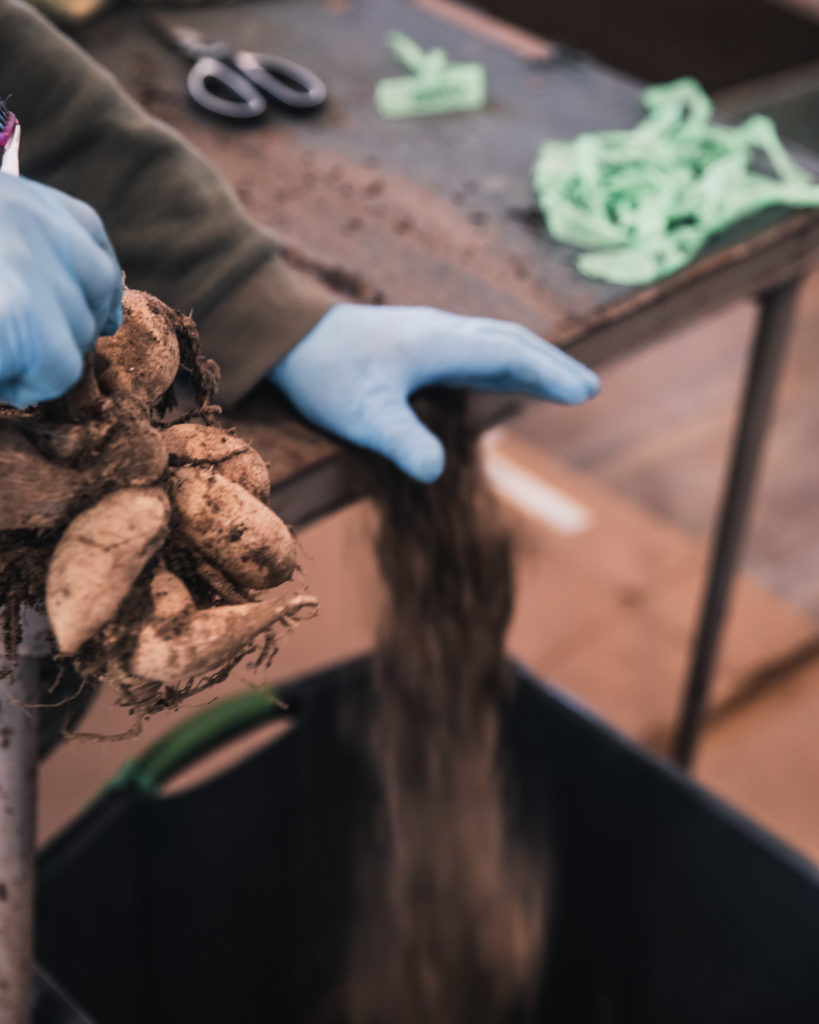
Soaking & Pre-Sprouting Ranunculus & Anemones
Do you have a flower that you really hope to knock outa the park this year . . . finally?! For me, it’s ranunculus and anemones. While we grew a handful of these beauties in Year 1, we have not really grown them since . . . but not because I did not want to!
In 2021, I was sent really sad corms: tiny, desiccated and/or molded. Right or wrong, I’m usually someone who just lets these things go, but this was pretty awful (and they were not cheap). I shared photos with the supplier and was thankfully provided a full refund. I tried sprouting them anyway and nothing, they were COMPLETE duds. I had some random corms in my basement from years past and grew just a few of those for myself but there was not enough for our customers. In 2022, I held off because our high tunnel construction was delayed and constructing ourselves was a large enough spring project in and of itself.
So I am crossing all my fingers and toes that this year is my year! They are a bit challenging in our climate, but I hope I can finally make it happen on a larger scale.
While we’ll get into the super nitty gritty of ranunculus and anemones on future plant profiles, I want to outline the soaking and pre-sprouting process, as this is something we do in February (these are going into a high tunnel).
Zone Considerations
In warmer climates, ranunculus and anemone corms can be planted in the fall or early winter and overwintered. In colder climates, it’s advised to plant corms in the spring, as the plants should not be exposed to temperatures below 25°F (-4°C). So, that is what we do here in Zone 4 and what we have always done when growing them in the past. However, secret: I have an experiment going on in the high tunnel overwintering ranunculus and anemones here in Zone 4b (a little more on that later).

Soaking
So, why soak corms? As with most things we grow, it helps to understand their native habitat.
Ranunculus and anemones are native to the Mediterranean and grow in areas where it rains in winter. In their native locations, summers are bone dry, so they have evolved to go dormant in the summer, and then rehydrate and grow once it starts raining in the fall. They become established and grow slowly throughout the cool winter before blooming in spring. Once it gets hot, the plants go dormant in preparation for the dry summer.
These are the conditions we are trying to mimic, and it’s also why you receive your corms dry. Corms are dried for storage purposes. It prevents them from rotting, but it also keeps them dormant until when you want to plant them. Growers break dormancy by soaking corms and then pre-sprouting them (mimicking their natural habitat).
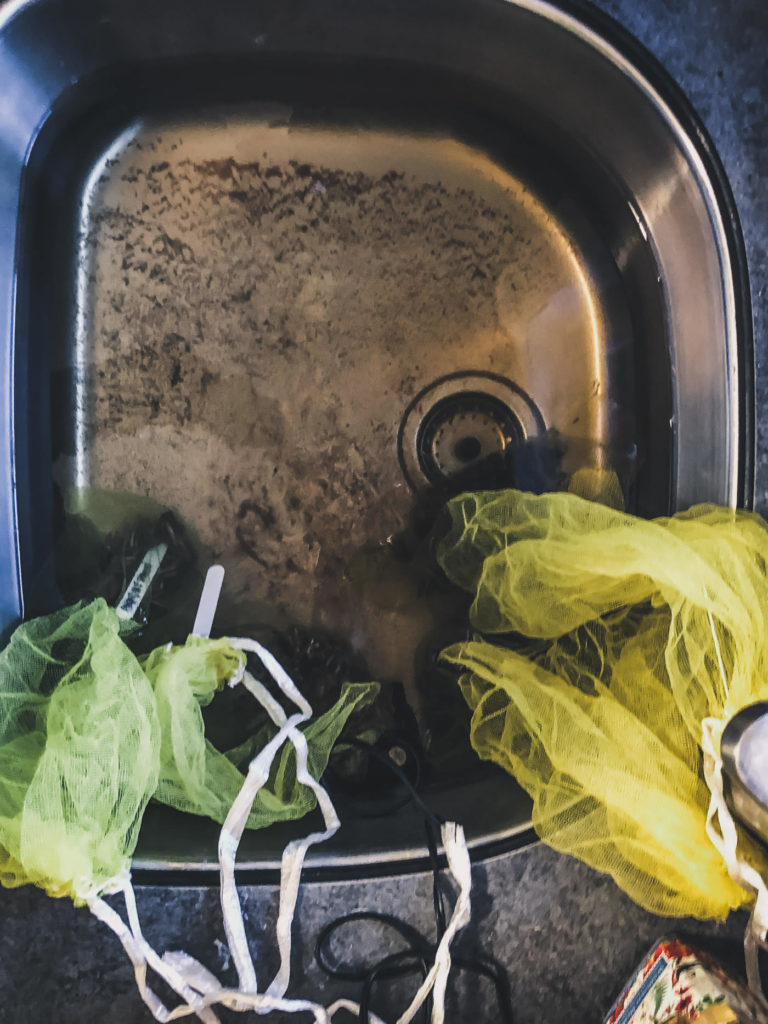
To soak corms, you don’t need much: Something to hold cool or room-temperature water, mesh bags to hold the corms, labels to identify the varieties, and a way to oxygenate them (extras: fungicide).
We soak our corms in cool water for 3–5 hours in a sink in our laundry room. While some growers mention longer soaking times, I’m too freaked out they will rot. I soak them all then pull the ranunculus first (3–4 hour soaking time) followed by the anemones (4–5 hour soaking time as they can last longer). We put each variety in yellow bulb bags with a label before soaking them. “Yellow bulb bags” are simply the bags that bulbs are often shipped in from wholesalers (we just repurpose them), but any mesh bag will do.
Most growers recommend oxygenating the water, so as not to drown them, but I’ve heard some do not. Because corms are expensive, I just do it. I use an aquarium pump that we already have on hand for distilling hydrosols. They are inexpensive and take a minute to set up. Alternatively, you can switch out the water or let the faucet drip.
Ranunculus and anemones are prone to disease, so many growers suggest using a fungicide at the end of the soaking. I haven’t always done this (mostly when I accidentally didn’t have any on hand, ha), but I prefer to err on the side of caution when possible, so I will use an OMRI-approved fungicide like Rootshield or Actinovate when I am being a good flower farmer.

Pre-Sprouting
Next up: Presprouting. Why pre-sprout?
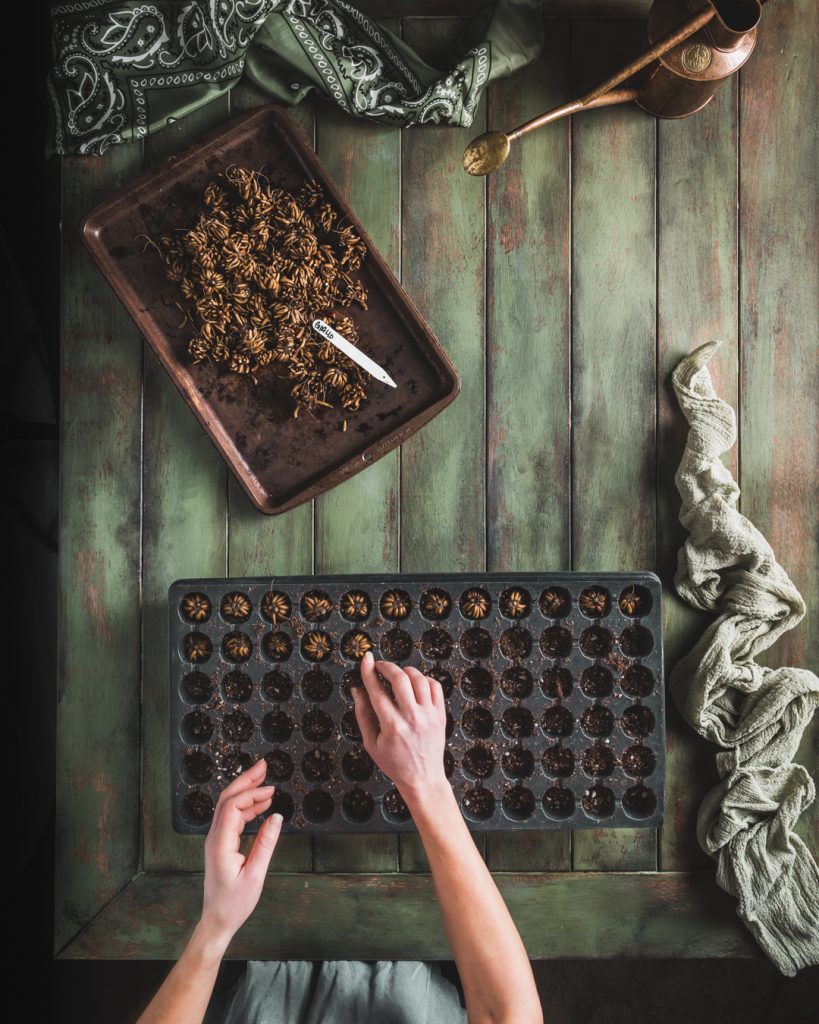
The truth is that you could simply plant the soaked corms right away. The main advantage of pre-sprouting is to ensure we’re only planting viable corms. In our climate, because our springs have such wild swings, we actually pre-sprout preferably in deep 50-cell trays. If the weather is unfavorable, the corms can grow on and be transplanted as small plants to give them a head start. I also like the cell trays in case there is an issue with rot because it’s isolated to that cell and does not spread.
There are many, many ways to presprout corms, but we use our normal soilless medium in cell trays (in that video I’m using a 72-cell tray because it’s what I had on hand at the time, but now I exclusively use deep 50-cell trays because they have more room). It should be damp but not wet (remember they are prone to rot).
At this point, most growers recomment putting them somewhere dark and cool (ideally between 40–50°F). I actually leave them in our basement for a day or two, which is around 68°F and then move them to our garage, which hovers between 40–50°F. Why? I dono, something about just soaked corms going into our cold garage seems too shocking. I read about a study that first had them around 70°F for a week and then moved them to cool temperatures. They didn’t explain why, but that’s just what I do and my reasoning behind it.
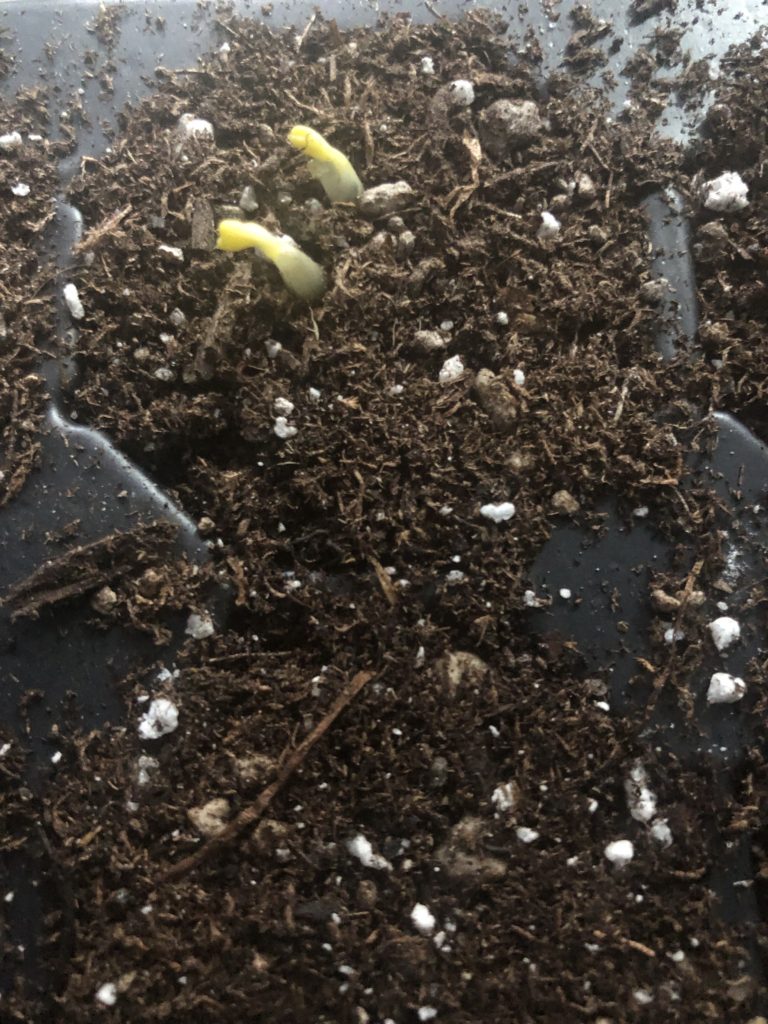
When I move them to the garage, I simply stack them and then leave them alone. I may check every few days and mist . . . only MIST . . . if they seem super dry. The corms will begin to sprout in as little as a week, but they can take longer. It all depends on the variety and how cool the garage is (which just depends on the weather).
Once they sprout, they are ready to be transplanted. If we are growing them on as transplants, I’ll move them under lights in our garage.
Dahlia . . . Are A Lot of Work . . . But Worth It!
Although seed starting ramps up in February, the biggest task on the farm is actually diving dahlias. People often ask how I do it all, and the answer is that I do not. While I, alone, lifted and divided all the dahlias for years, it got to be overwhelming by the time we encroached on 1,000 plants. We continuously increase dahlia production year after year (mostly because someone is addicted to dahlias, ahem, but also because our customers love them, making them an important source of revenue on our farm).
In 2021, Matt was working out west in the fall while I was lifting dahlias in the freezing cold with a headlamp. I actually like gritty work. It makes me feel like I accomplished something (I think it’s because I’ve worked in front of a computer for most of my adult life). However, I was also exhausted and came to the realization that dividing all of these would take a significant amount of time.
Matt asked how he could help, so when he got home, I showed him how to divide dahlias. Naturally, he was *way* better at it than me. He’s meticulous, whereas I get bored and impatient. He consistently gets more viable tubers than me, so he has pretty much taken over dividing tubers entirely. If I get done with work early, we do some together over happy hour 🙂
Anyway, all that to say, it’s OK to ask for help. It’s also OK if you don’t have help yet and feel overwhelmed. You’re not alone, and I hope the exercises in the beginning gave you some clarity on where you thrive and other areas where you might ask for help in the future.
While we’ll dive deep on dahlias in a future plant profile (spoiler alert: next month, eek!), I want to share how we divide them as part of this month’s farm tasks.
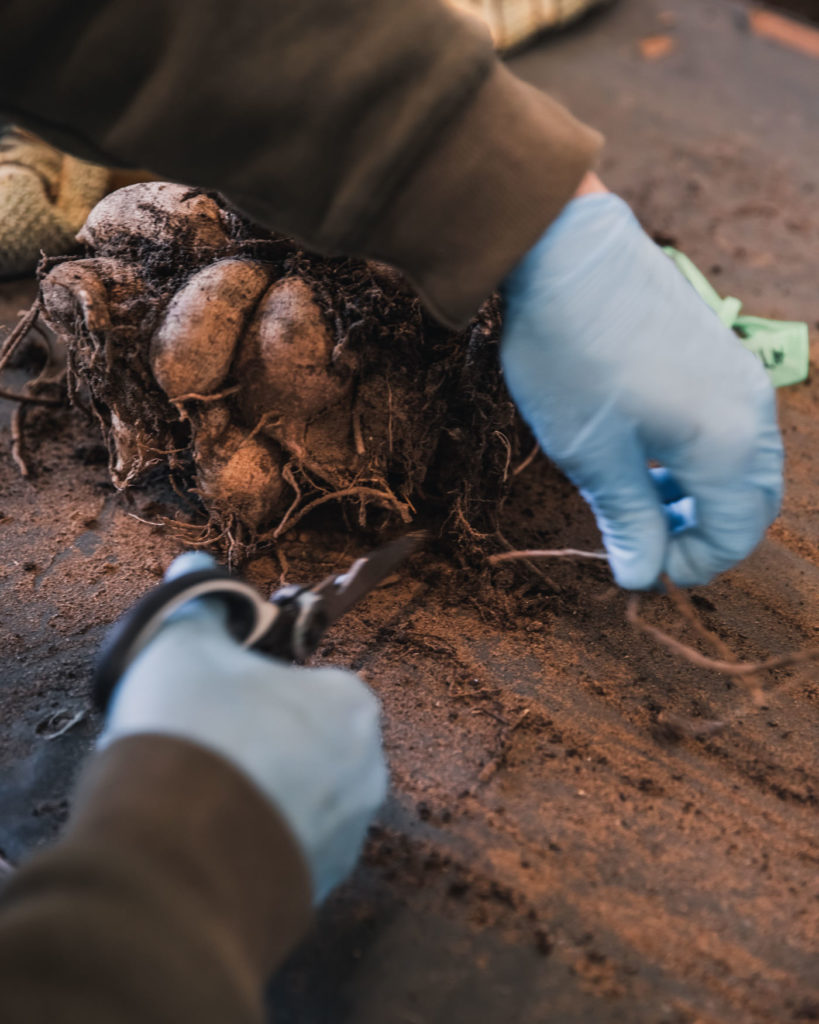
Dividing Dahlias
Lifting, Labeling, Storage
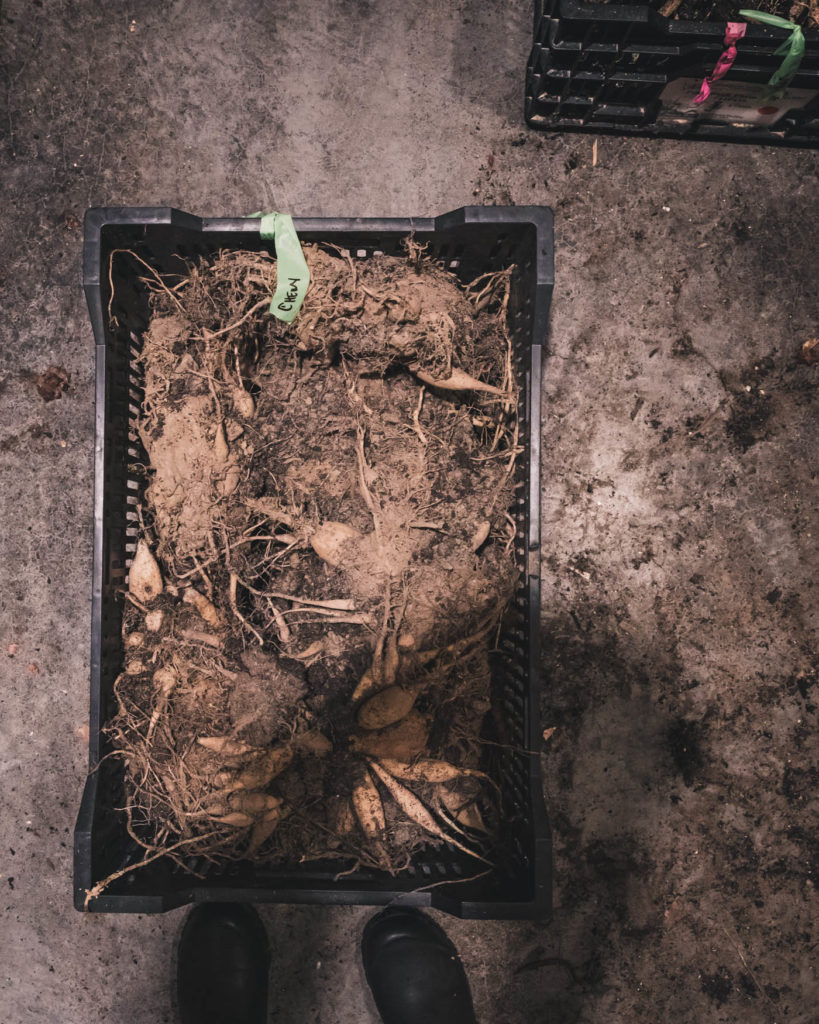
First, when we lift our dahlias in the fall, we leave some dirt on the clumps and place them in bulb crates or cardboard boxes. I find that they store best in full clumps with some dirt still attached, but it is important to note that we have gossil loamy sand (as in our soil is more sand than loam). We store the clumps whole in our cooler, which we convert into a heated area. It consistently stays between 44–46°F and around 70% humidity.
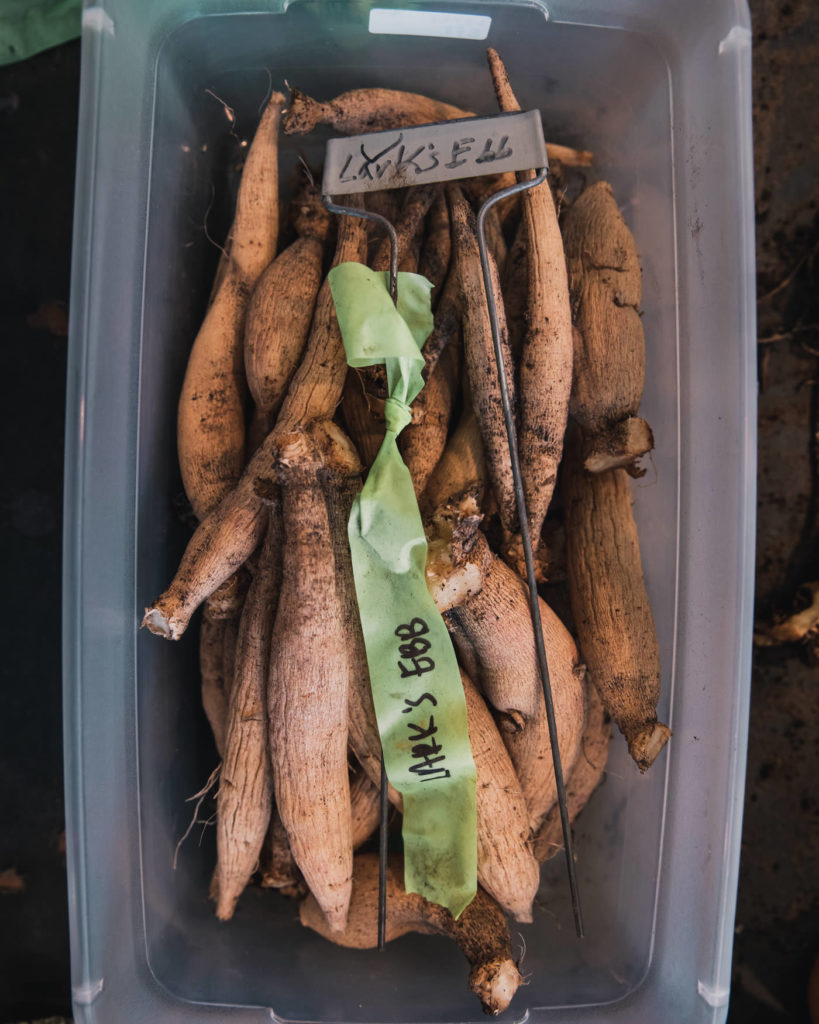
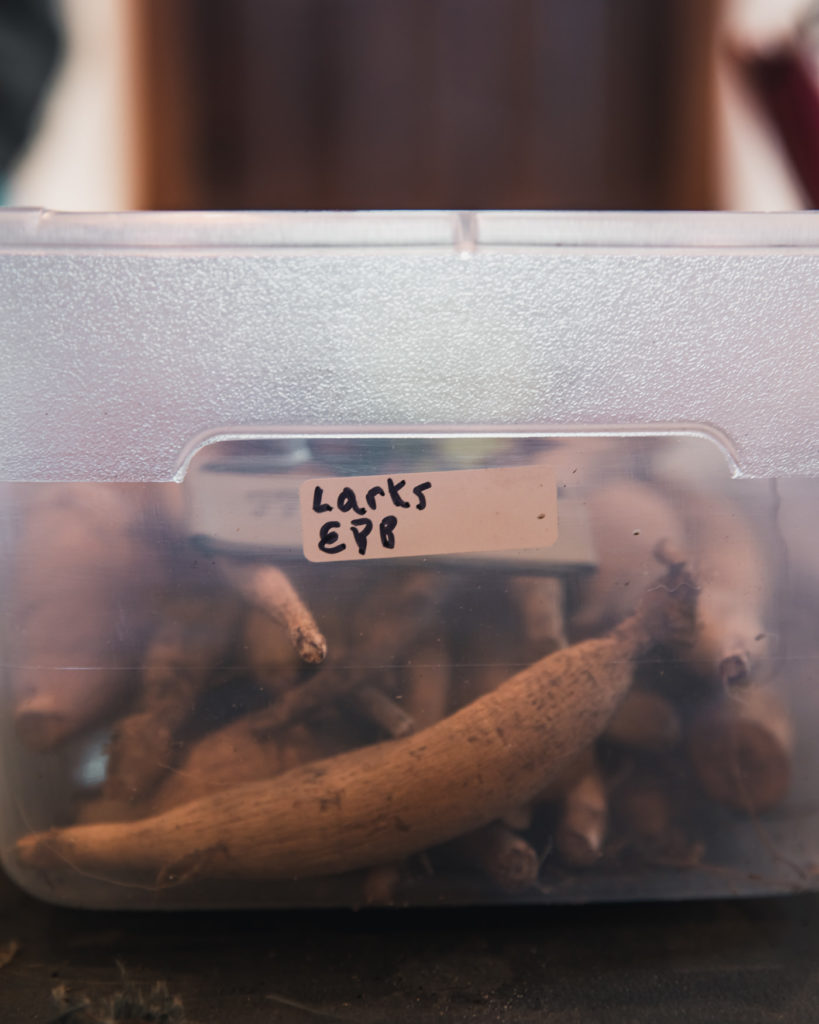
When we lift dahlias, everything has already been labeled. There are plant stakes with labels, but each plant is also labeled prior to frost with flagging tape. And then each crate gets another duplicate label/color. I use green for anything we plan to sell and pink for anything we do not want to sell (if it’s a new variety, unknown seedling, building stock, etc.). This just makes things super clear for Matt when he goes to divide, and those labels will be carried on throughout the process.
While the majority of dividing happens in February, Matt has started dividing at the end of January as our collection has grown (it takes about a solid month to divide them all). He starts with greens so that we can decide on inventory for our dahlia tuber sale in March. Pinks may wait until closer to April/May since we are holding them back.
Setup & Tools
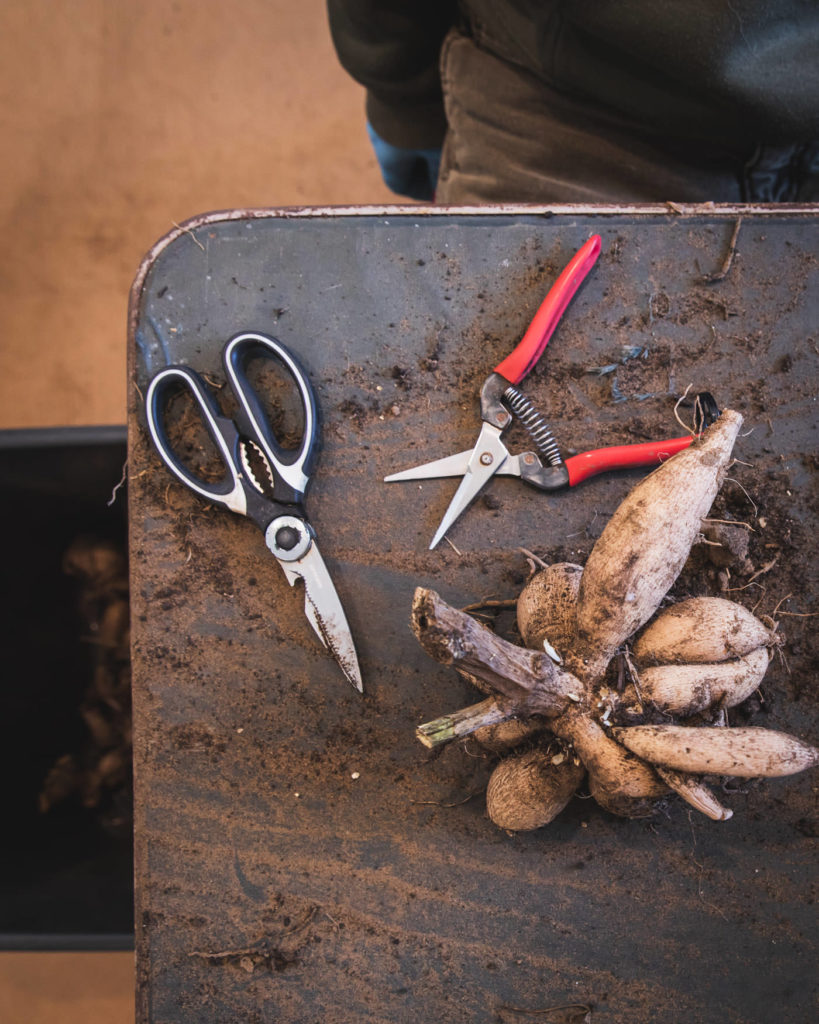
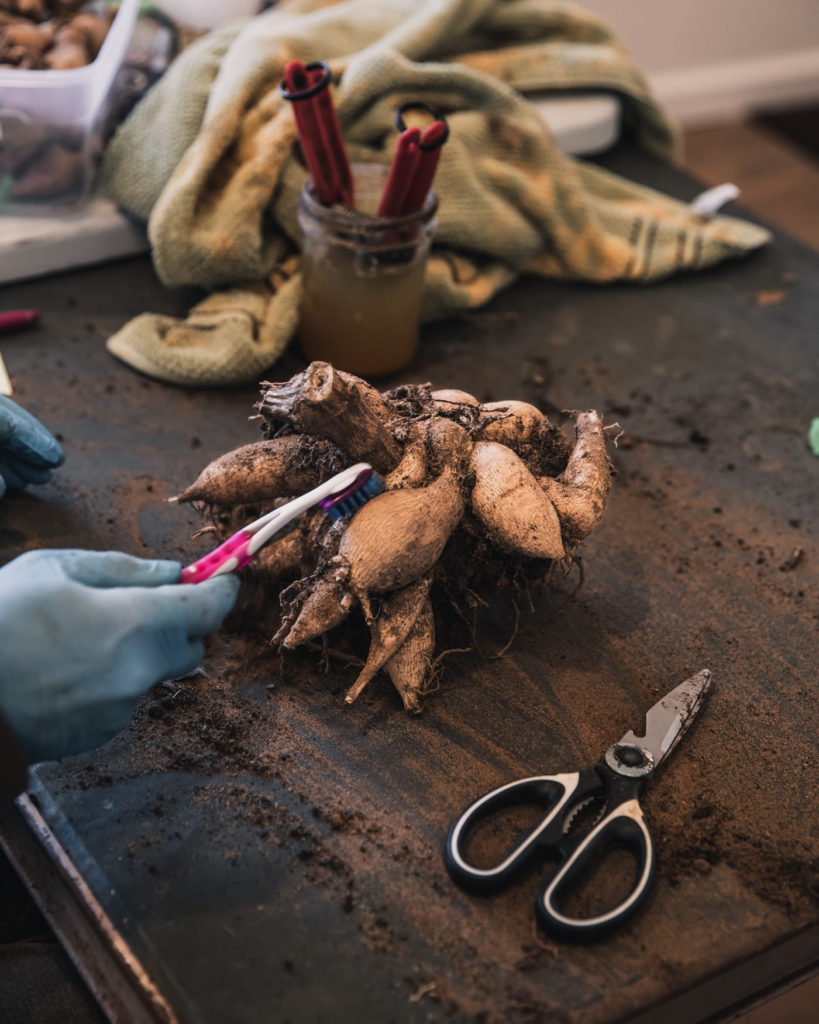
For a setup, we have a table over some cardboard with a bin below the table for excess dirt and throwaway tubers and debris. Because our soil is so sandy, we can simply brush the tubers off versus washing with a hose (growing in sand does have like 2 advantages, ha). For this, we just gently shake the clump or use a toothbrush.
For the majority of dividing, we prefer needle-nose snips (the same kind we like for harvesting). We are strict about sanitized tools, so there are at least two pairs of snips in a jar of water/10% bleach solution.
While we would never knowingly keep a diseased plant, we are still cautious at every stage. According to the American Dahlia Society, it’s virtually certain that gardens contain a mix of clean and virused dahlias, especially since some plants lack any evidence of virus at all.
I’ll go deeper on dahlia virus next month (and appreciate level-headed positions like Dr. Keith Hammett), but the ADS recommends two major steps for becoming part of the solution to the dahlia virus issue: 1) removing any suspicious plants and 2) using disinfected tools between plants. We go one step further and also test a subset of our dahlias for virus (these tests are expensive, so it is is not economically viable to test every plant, but we think it’s a step in the right direction).
According to the ADS, there is no more aggressive “attack” on your plants than when you divide clumps into tubers. So, we use what they consider the “gold standard” which is a 10% bleach solution. After each clump is divided, the snips go into the sanitization jar and the snips are used in turn. New clump, new snips. (P.S., the toothbrushes are also sanitized and dried with a towel).
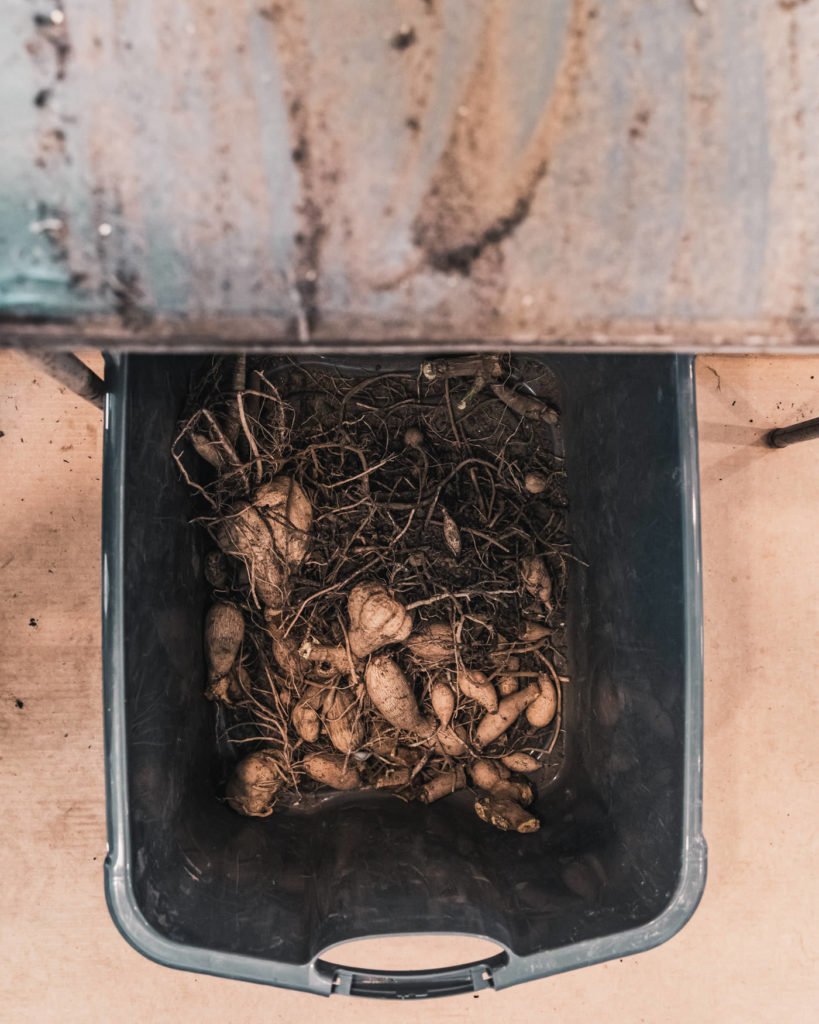
Divided tubers go into smaller bins and are covered with vermiculite (these are just small bins from Wal Mart).
Are you wondering about the gloves? They aren’t specifically for sanitation purposes. Matt prefers them so that he’s not getting the bleach solution on his hands and so that his hands stay clean.
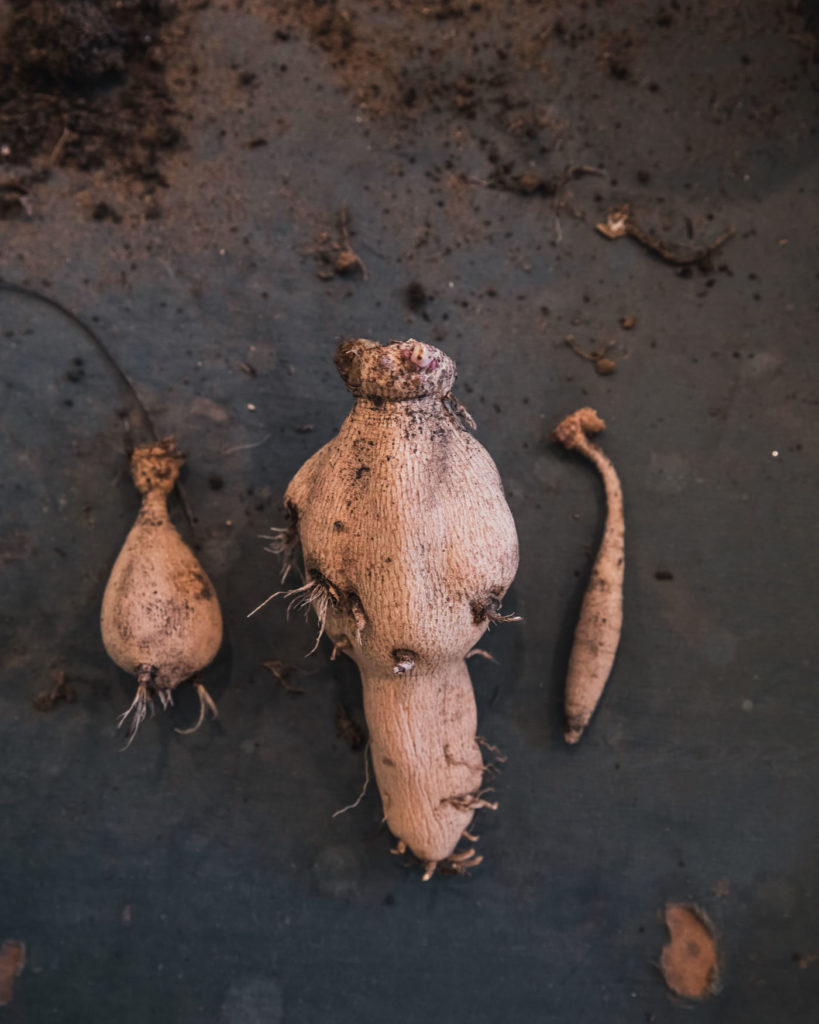
Tubers
Before we talk about dividing clumps into tubers, it’s important to understand dahlia tubers. When you plant a dahlia tuber in spring, it produces a plant that produces multiple blooms, which eventually produces multiple tubers (in a clump) that can be dug up in the fall. This clump of tubers can be divided into individual tubers, which can then be planted to produce more plants with more flowers and MORE tubers . . . basically like freakin flower math magic!
Tubers and tuber clumps come in a wide variety of shapes and sizes. Some are super long and skinny, while others are round and plump. Some are small, some are huge, and others are in between. While size matters for bulbs like tulips and ranununculus, it does not matter for tubers, so long as they are bigger than AAA battery (they just need enough stored energy, more below). Some store amazingly (Chewy!), while others are challenging (Cupcake and Karmel Korn).
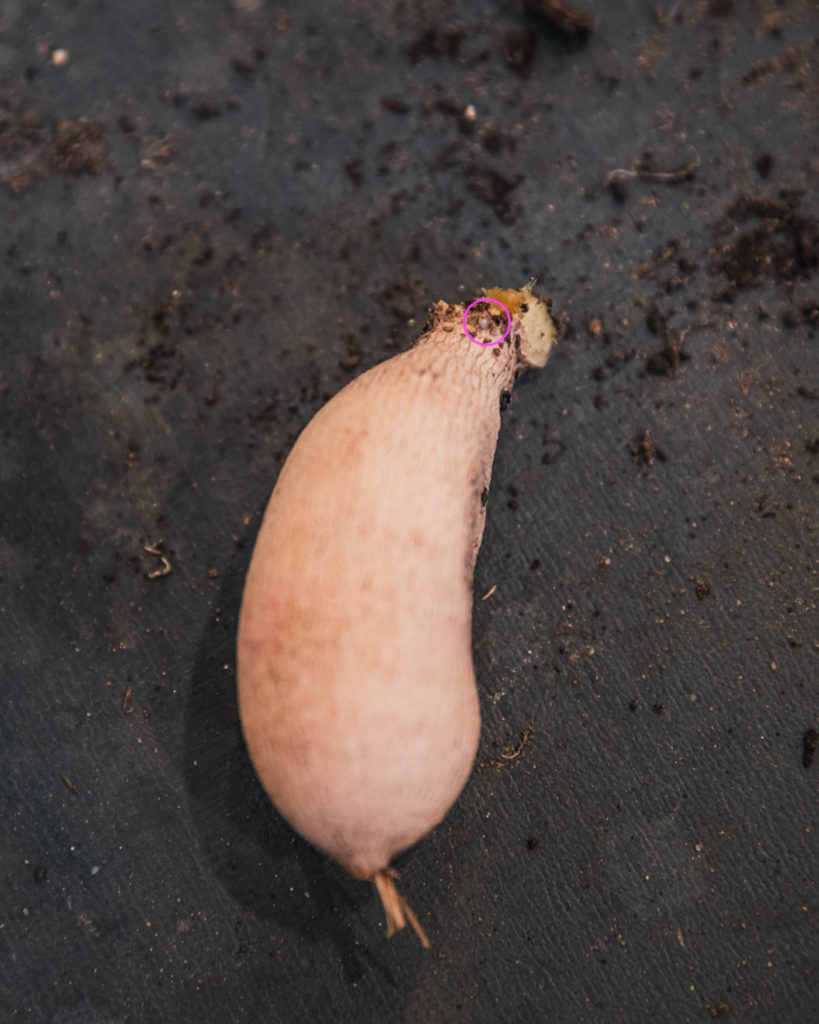
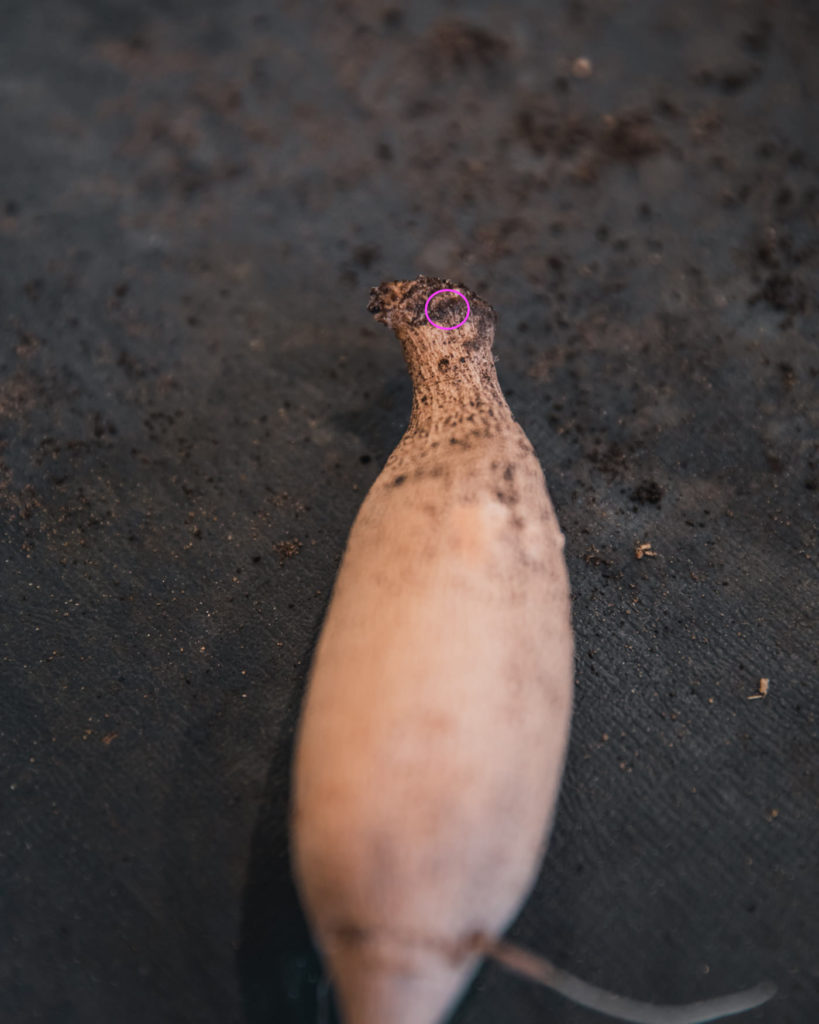
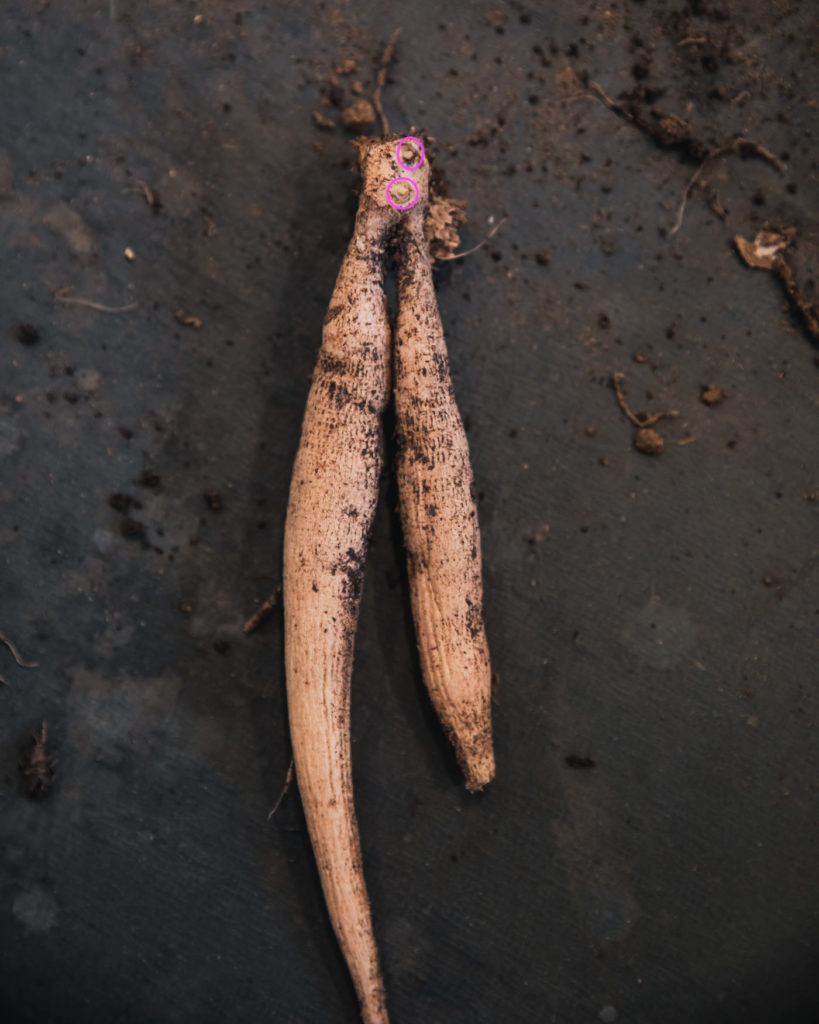
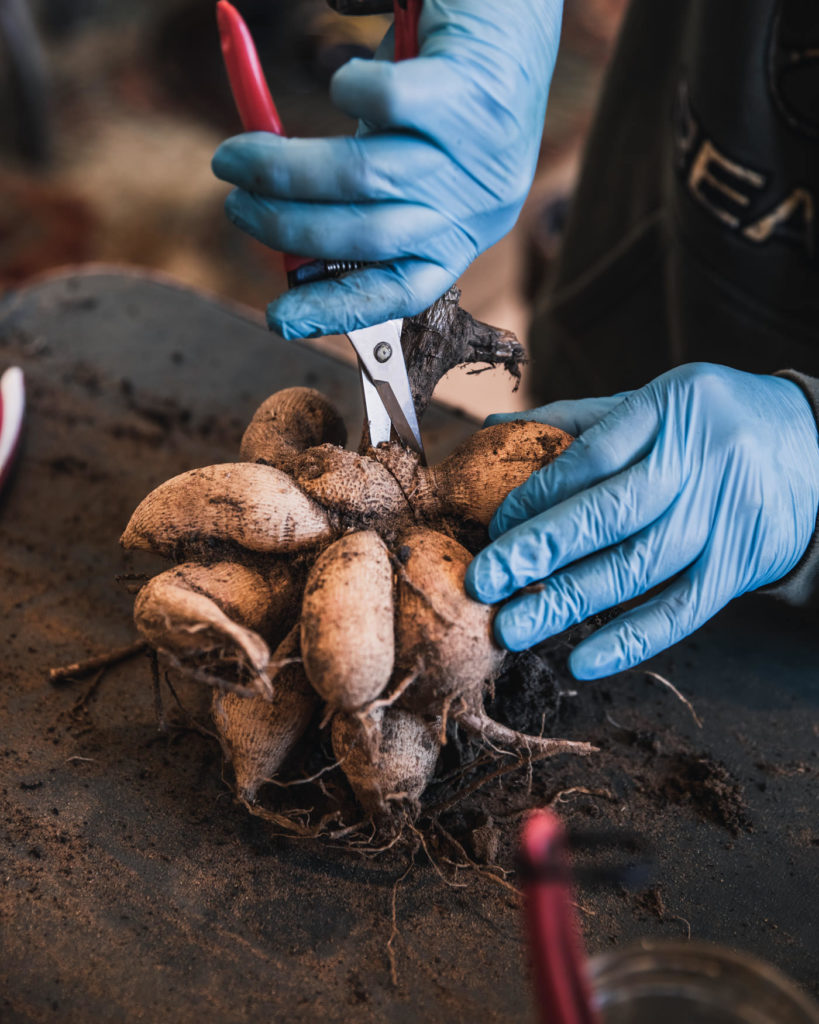
You might be all excited to see all those tubers, but for a tuber to produce a plant it must be “viable”. In order for a tuber to be viable, it needs to be healthy, but it also needs to have an eye and an intact neck. In fact, these are the 3 major important parts: the tuber, the neck, and the crown (where the eyes form).
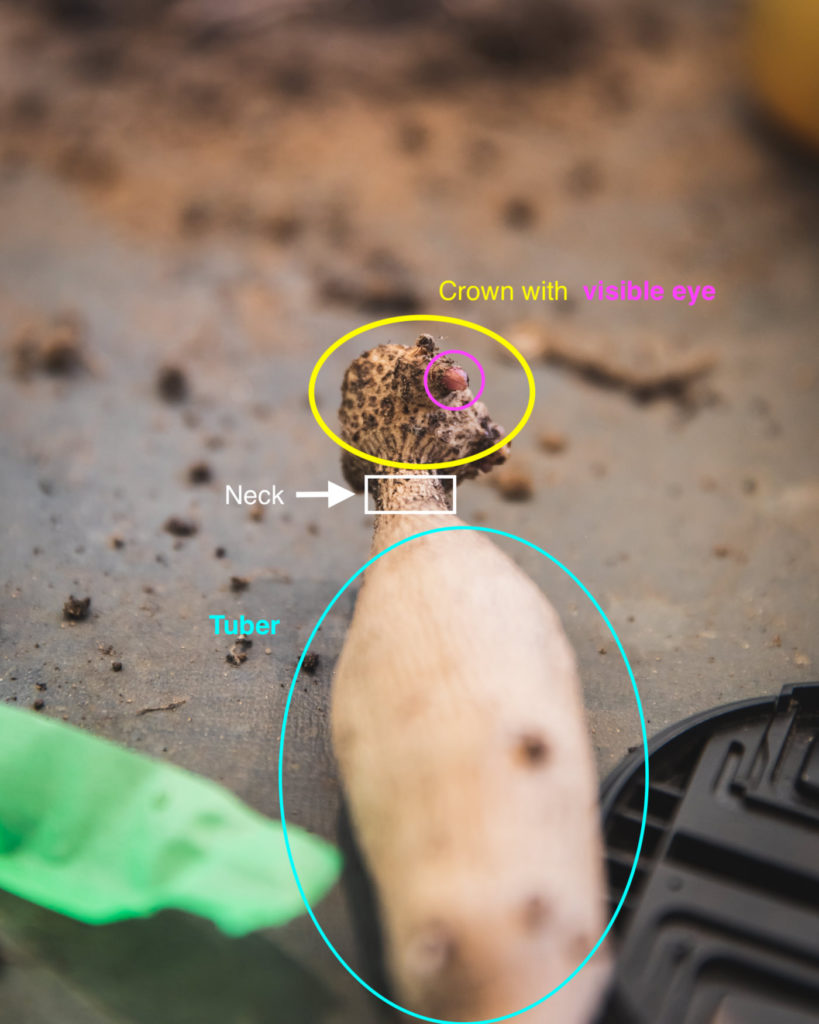
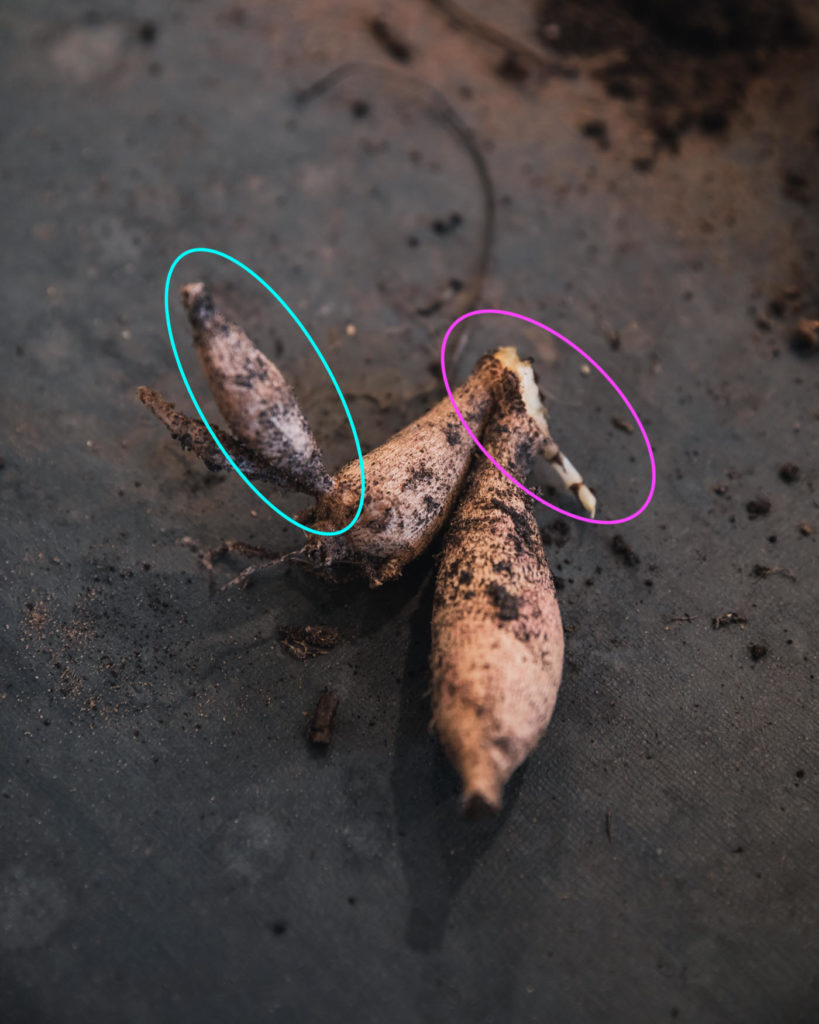
What we’re after is healthy, plump tubers with an intact neck and a viable eye. If there is no eye, the tuber will not produce shoots. The tuber is the energy source, so if the neck is broken, we won’t have enough energy to produce a viable plant.
When the tubers are dormant, sometimes the eyes are difficult to see (this can be highly dependent on variety). Likewise, tubers break dormancy at different times. Below is a closer look at tubers with eyes of varying degrees of diffulty to see.
Dividing Dahlias
To begin, we first brush off excess dirt dirt by shaking the clumps or using a toothbrush. This makes the clumps easier to see. We remove the longer “tails” coming off the tubers.
While some folks recommend splitting the clump into smaller, more manageable pieces, Matt just starts cutting out individual tubers. He said he gets more tubers this way versus splitting it up. Once he identifies a viable eye, he removes that tuber with the part of the crown that has the eye intact. Anything that has a broken neck or no eye gets tossed.
All “good” tubers are graded and put into one of two categories. Basically, the primo tubers get put into a “Yes/Sell” category and the others go into a “Good Enough for Us” category, HA! Why? We sell our tubers, so the “best” looking ones go to our customers (very visible eye, plump, etc.) Ones that are shriveled or have a harder-to-identify eye or are rougher looking stay with us.
This is a simple way for Matt to communicate back to me, so that I can make inventory decisions. There are a few varieties that are *always* shriveled for us, like Karmel Korn, but I will still sell them since people want them. I just now put it in the description for our sale.
P.S., the truth is that these less-than-desirable tubers are *perfectly* fine. Flower farmers often joke when people complain about tubers not being in perfect condition, because “you should see the ones we grow lol!”
Storage
Once the tubers are separated and graded, Matt lets them dry out a little (due to the fresh cut). He then puts them in smaller bins with all of their original labels (you can never have too many labels, just in case there is an accident). He covers the tubers with vermiculite, then back into the cooler where the temperature and humidity are controlled. We just use small bins from Wal Mart for about $1.
Inventory, Images, Descriptions, Website
February is super busy with making decisions based on inventory. Once I know what we’re selling, I update photos, descriptions, and all the BTS logistics of our website. I send out newsletters and create social media posts letting customers know about the sale. I’m still actively working on this as we speak!
Our 2023 preview is not live yet, but our sale is scheduled for March 11 at 11AM Central. If you’re interested, hop on my newsletter for reminders (P.S., we like to do a big giveaway with some of our most-treasured varieties, and I give newsletter subscribers the option for more entries if they want in).
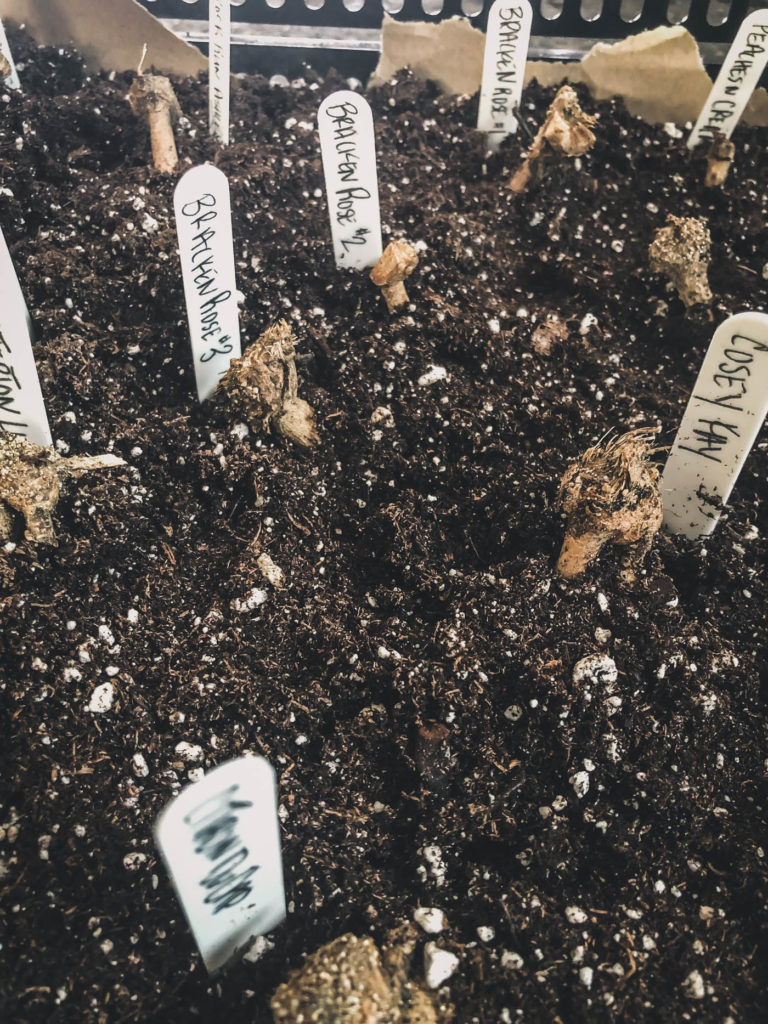
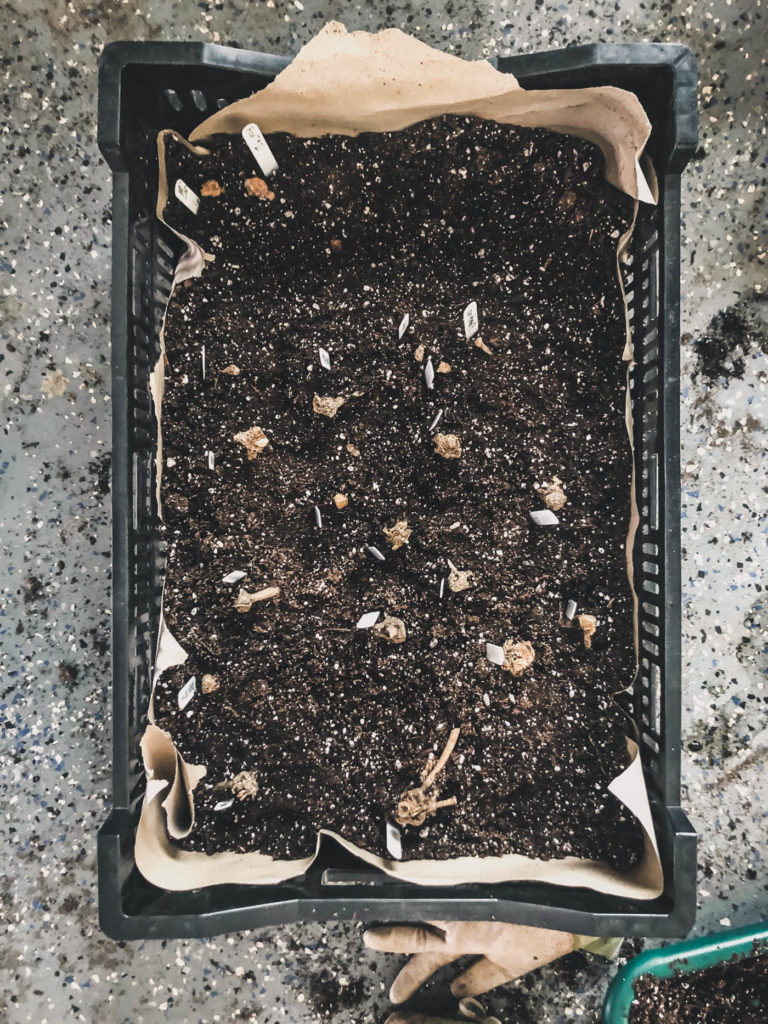
Dahlia Cuttings
February is also when I’ll wake up some of our more-rare varieties in order to take cuttings. Taking cuttings is a great way to increase your stock!
To wake up tubers, we put them in a bulb crate with our regular soilless mix (Sungro). First, I line a bulb crate with paper, then fill with damp soiless mix. I put the tubers with labels in the medium but leave the neck and crown/eye sticking out. The reason that I do this is so that it is easier to see when taking cuttings. Then they go on a heat mat set around 70°F under lights.
PLEASE NOTE: Heat mat should only be used in *cold* environments. My current basement conditions did not need this heat, and I believe it led to a few tubers rotting this year. Ultimately, they should be placed in an *area* that stays between 65F-70F (18C–21C), whether that’s the temperature of the room or with the help of a heat mat when warranted.
I did one crate a few days ago as of this writing, so mine do not have shoots yet. I’ll likely do more through March. Once they produce shoots with *at least* two fully-formed leaves (and more coming), I’ll take my cutting. Prior to cutting, I’ll fill a 128-cell tray with damp soiless mix and create holes with a pen/pencil (we are going to dip these in rooting hormone, so we want it to stay on the cutting).
For cutting, my goal is a clean cut right where the green growth meets the brown neck. Some people take part of the tuber, but I don’t want to damage my tubers. If you don’t cut low enough, though, you’ll get branching/mini shoots. Once the shoot is cut, the cut end is dipped in rooting hormone (follow the label instructions) and placed in the pre-poked hole (be sure to label).
The tray is put back on the heat mat, because cuttings like bottom heat. I will mist them maybe once a day, but no humidity dome unless they seem like they need it. Once rooted, I will bump up to a 72 cell-tray. I’ll share more here as things progress through Feb/March.
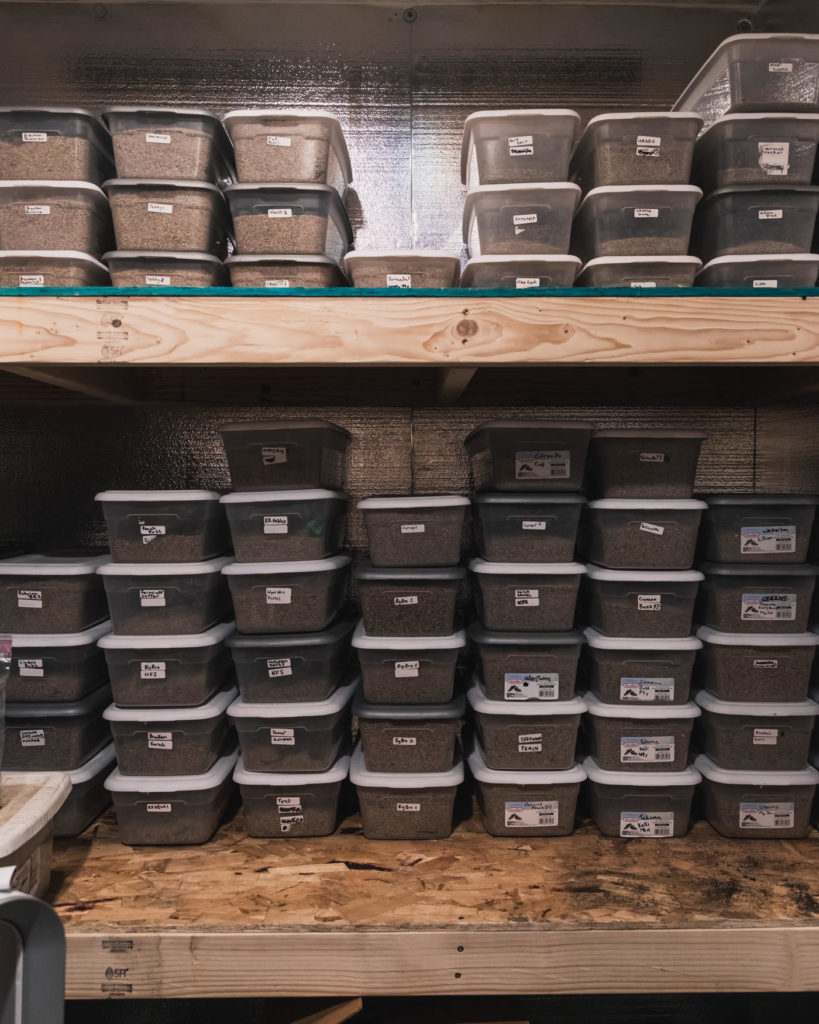
Field & Harvest Inventory
February is a good time to take inventory of some of our most-used items on the farm. I review my field and harvest inventory checklist (located here) and then I’ll add anything we need to my planner based on when we need it. I don’t need to purchase every item every year and when I purchase just depends on when I need it or where I’m purchasing (we buy mostly local, but some of our suppliers are over an hour away, so we try to make as few trips as possible).
A note on links: FFY members are located everywhere from our local community to many different countries (literally, those of you that have reached out, it’s SO cool to connect from as close as my backyard to all around world on a common, collective theme: growing amazing plants and dreams . . . many of you have become friends, I genuinely love following your journey, so please don’t hesitate to drop me a line).
Anyway, I added a few links where I thought specifics matter or to our local sources’ catalog/websites so you can see exactly what we use (because I know I like to know these things). However these may not be the best options or places to purchase. I highly suggest seeking out what local resources you have . . . I literally hate talking on the phone, but I cannot tell you how much value there is in creating relationships with local folks. Most of the items I purchase are simply chosen because it’s what’s available (not brand specific). Generic items are not linked.
For my local FFY members, we purchase from: Green Grove Supply, Ohio Earth Food (WI location), Green Earth Compost, the People’s Food Co-op, Seed Saver’s Exchange, American Do-It Center, Home Depot, Menards.
Aside from the normal, annual inventory, here are a list of larger investments/one-time purchases that should be considered:
- Backpack sprayer
- Broadfork
- Compost tea brewer
- Cooler
- Hand tools (snips, pruners, pitchforks, shovels, rakes, cultivators, etc.)
- High Tunnel/Greenhouse/Propagation House
- Irrigation
- Landscape fabric
- Propagation tables/shelves, trays, domes, lights
- Seeder
- Tiller
- Tilther
- Tractor
- UTV (or other type of utility vehicle)
- Vacuum Seeder
- Other tools (post driver, post digger, post puller)
This will all depend on the size of your operation, skillset, budget, time, what you already have available to you, and your unique needs. If it was my first year, I’d be focused on the soil (testing and amendments), irrigation, and weed management. Use what you have and upgrade as you learn what you truly need to make your operation successful. There is no one-size-fits-all approach, and this is a lot of trial and error. If you have any specific questions, leave a comment, I’m happy to help if I can!
Order
Vases
Because Accent Decor stock can be a little up in the air, I order my vases early if needed (just placed on this week). The Laney vases are our standard vases, but we do have an option for upgrading to compotes (love the Benoit, Lyra, and Winnie). I love Accent Decor, so random items will often end up in my cart, even if they are just for me! You always hear, show the work you want to be doing, and I hope to do more design in 2023, even if it’s just for me to photograph for marketing material.
Dahlias
As mentioned in January, I basically participate in dahlia sales most winter months. Throughout the year, whenever I see a dahlia I like (which is often), I add it to a spreadsheet wishlist. I look up the variety on dahliaaddict.com, and put those sales on my google calendar.
Every year, this is completely different depending on what’s on my wishlist. When I was just starting out and wanting reliable varieties, there were a lot more options for the less-rare varieties, so I’d cross reference prices. Now, my wishlist items are down to the pretty rare items, so there are usually only a few sales that have what I’m after (like Westerton Ella Grace!). At the risk of totally embarrassing myself, I’ll share all of the varieties we’re growing in Dahlia’s Plant Profile (including who is still on my wishlist).
Forgotten Seeds
While I try and order the bulk of my seeds in December and January, it never fails that I forget to order some 🙂
Sowing
I am totally behind on February’s sowing. I was traveling half-way across the country for work, and that put a delay on things. Hopefully I’ll get caught up next weekend. What we’re sowing in February:
- Gotu Kola
- Chinese forget-me-not (we have a wedding in May, so I am trying to push some blues in the high tunnel)
- Eryngium
- Orlaya (High Tunnel)
- Peppers
- Stock (High Tunnel)
- Bachelor’s buttons (we have a wedding in May, so I am trying to push some blues in the high tunnel)
- Celery
- Corn cockle
- Snapdragon (Low Tunnel)
- Anemone (presprout)
- Ranunculus (presprout)
- Lettuce
- Phlox (High Tunnel)
- Saponaria
- Sweet pea (High Tunnel) I realized I put this in Jan, but I sow in Feb
- Tweedia
- Cup-and-saucer vine
- Delphinium
- Onion
- Peppermint / Mint
- Artichoke
- Rosemary
- Cabbage
- Statice
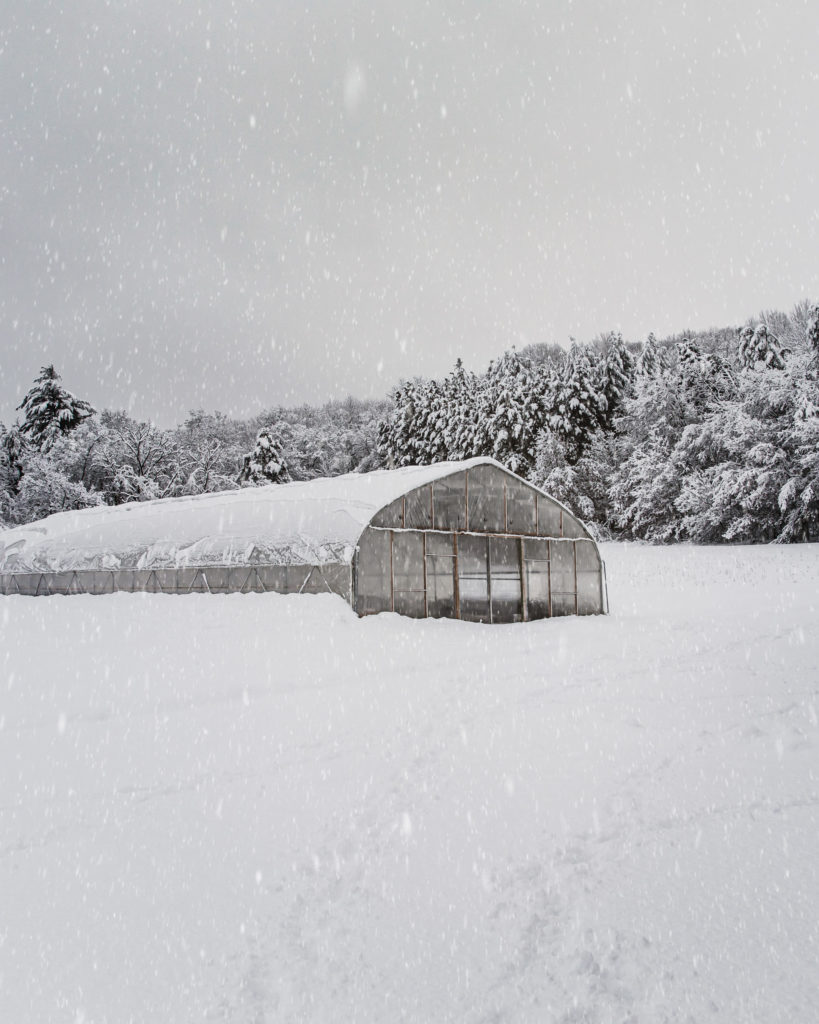
High Tunnel
This is our first winter with a high tunnel, so I am still very new to all of this. In February, I’m focused on:
- Cleaning. I’d like to say I finished this task in fall, but I did not.
- Soil Test
- Monitor roses (we’re not pruning yet, but dead, dying, broken and diseased growth should be removed any time of year)
- Monitor for need to water. Plants will begin growing as days lengthen and will likely need water. I actually have watered the roses, and my garlic has already sprouted (which is underneath the roses). I’m guessing the tulips will be up soon. We cannot turn on our waterlines until risk of frost is gone, so we strap a 25-gallon tank to our ATV.
- Monitor . . . ranunculus and anemones!
Yes, I am doing an overwinter experiment of ranunculus and anemones in Zone 4. Is this crazy? Maybe, but I hope not.
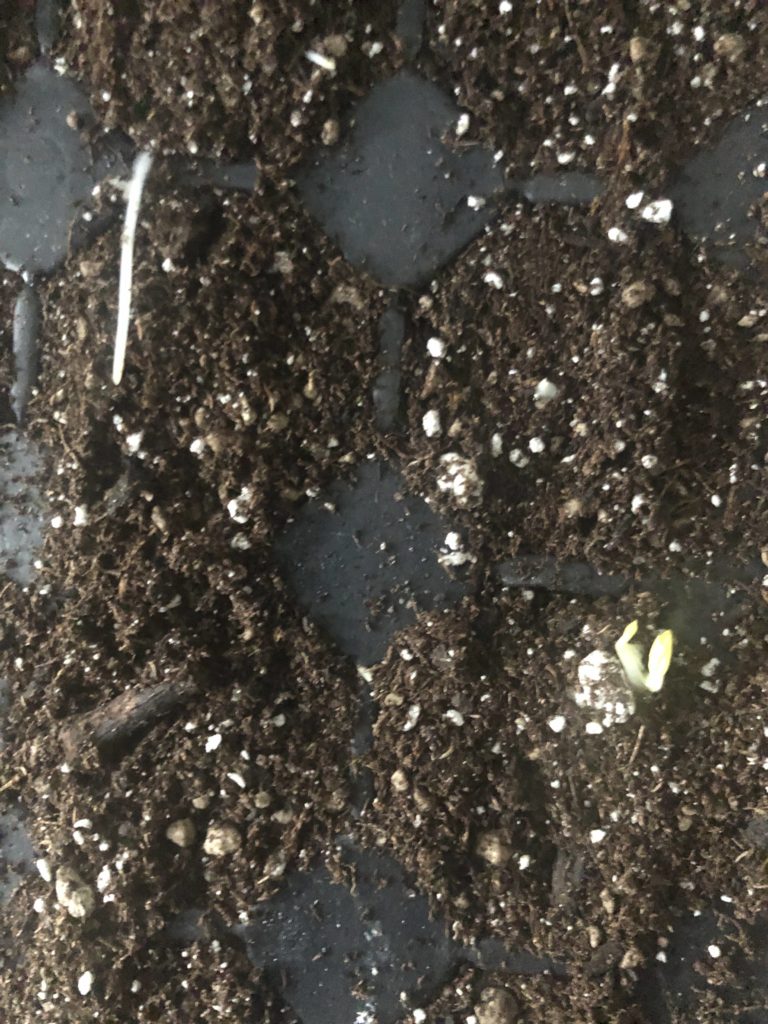
I have no idea if this will work, but because I cannot help myself, I did push away the soil to see if the corms had made it, and they are juuuuuust beginning to sprout (still below the soil, but tiny signs of life and sprouts poking through on the corms). I only checked a few, as I am trying to restrain myself from disturbing them.
We have temps of –10F coming up next week, so still too early to know how this will all play out, but I’m optimistically hopeful. The reason this is so exciting is that conventional knowledge says do not overwinter ranuncs/anemones any colder than Zone 6. Regardless of what happens, I’ll be sharing all of the nitty gritty deets on this experiment in an upcoming plant profile (including the study that prompted me to try this).
Taxes
While we discussed taxes in January, friendly reminder for my US folks that it’s tax season.

Website
In today’s modern age, I think a website is an absolute must for all businesses. I mean, when is the last time you looked something up in a phone book? If you are looking for a product or service (or, um, anything?), what’s the first thing you do? I’m guessing most of us look it up online. Your potential customers are likely looking for YOU online.
A website is usually a customer’s first experience with a brand or business. Most people have zero attention span, so you want to make sure you grab their attention fast!
Starting a Website
Don’t have a website yet but want one? It’s absolutely OK, we’ve all been there, you got this! If tech stuff totally freaks you out, my suggestion is to start slow and be patient with yourself.
Websites can be a little frustrating at first, but most platforms have a ton of how-to videos and support. My number one advice is to just start by researching different platforms and evaluate them based on your unique needs: goals, budget, time, and skillset.
After that, be patient with yourself and your timeline for getting it up and running (in fact, before you set up your whole site, I’d actually start with a landing page that has a newsletter signup . . . more on that below).
I haven’t met a person yet who hasn’t lost a few hairs when starting their website, totally normal! It can take a little bit to get things set up, but you’ll learn a lot along the way, and making updates after that will be a breeze.
Platform Options & My Personal Experience
I’m not familiar with all of the platforms, but I’ll share a few I have either worked with or know of below. Please note though: these platforms change ALL of the time, as do their features (some of what I say may even already be outdated by the time you read this), so be sure to do your research.
While I haven’t worked with Squarespace personally, many flower farmers and small business owners love it! If you’re freaked out by tech, this is one of the better choices if you want to get a site set up quickly, as there are many beautiful templates. It’s highly rated for ease of use, especially if you are not comfortable with the technical aspects. It’s also an all-in-one platform, so it has e-commerce functionality built into it if you want to sell your farm products online.
I chose to put my first website on WordPress (.org not .com), because one has much more control with WordPress (I’m kind of a control freak, especially when it comes to aesthetics). However, with this control/customizability, one has a lot more responsibility on the tech side (hosting, coding, updates, etc.). The learning curve is much more steep. Also, due to the open sourcing and a WordPress.org site’s server access, it’s technically more “optimizabe” for SEO (search engine optimization . . . basically how you rank in Google search).
If at this moment, you’re thinking: I have no idea what you’re talking about, don’t worry, I didn’t either when I started (just keep it in your back pocket depending on how deep you want to dive in on the tech side). I just want to share it in case any of this is relevant to you.
Back then, there were no drag-and-drop design builders/editors for WordPress, so there was a lot of code putzing. I only know enough code to be dangerous. WordPress NOW has a drop-and-design builder (Elementor), but I switched platforms before this, so I don’t have experience with it, but I have heard really great things.
At the time, I enjoyed Wordpress, but I didn’t like how arduous it was every time I decided to switch up my site design (which is often for me, based on how we evolve as a business, and because I just like aesthetically pleasing things and I’m constantly refining). So, I went looking for another option.
I stumbled on ShowIt a few years ago through other creatives and small business owners I admired. While it’s typically more-geared toward photography, creative, and/or service-based businesses, I thought it translated to the farm. What I LOVE is that it is truly drag and drop: complete control of the design with NO CODE, hurray!
While I designed our site, there are also many template providers out there (in fact, after some requests, I’m working on a set of my own, shh). The cool thing about ShowIt templates is that they are completely customizable (where as Squarespace templates are not). Don’t like where that image is? You can literally drag it and move it!
Setting up the shop side takes a little finagling, but there are a lot of tutorials out there. Also, ShowIt blogs run on WordPress (yay for SEO).
WordPress and ShowIt are comparable in price (depending on what tiers you choose + hosting), while Squarespace is more affordable (and you know exactly what you’re paying for because it’s an all-in-one platform). However, you are limited to the templates and functionality with Squarespace (but that might be a GOOD thing depending on your needs, and there are *stunning* Squarespace sites).
While I’m not as familiar with Squarespace templates, Restored316 for WordPress and Tonic for ShowIt are two fabulous template creators for their respective platforms!
While these are just three platforms, know that there are MANY great platforms out there, so don’t be afraid to check out others! Honestly, they all have pros and cons, so it just depends on your unique needs. I haven’t found one that’s perfect, but in today’s day and age, most are pretty amazing and should cover your needs.
Landing Page
OK, back to the landing page and newsletter: While you’re working on building your site, I would set up what is called a “landing page” to start building your email list. An email list is one of the most-important tools in any business!
Depending on the platform you choose, you should be able to google, “how to set up a landing page on [fill in your platform].” This is just a super simple, single page, so that when someone visits your url, they get a page that says something like: Site coming soon, join our email list to be the first to know when we have sales.
At this point, you’ll need to choose an email service provider if you don’t already have one. Then, you’ll connect your email signup via your landing page. Virtually all platforms and email service providers have tutorials for this, so it will just depend on who you choose.
Review & Update Existing Websites
Have a website? Awesome, bravo, you’ve done a lot of the heavy lifting. February is a perfect time to take a look at your website with a fresh set of eyes.
Here are some questions to consider:
- Does it reflect the image/message/values of your business?
- Does it take your customer on a journey?
- Does your copy have your ideal customer in mind?
- Are visitors able to easily find what they are looking for?
- Are you keeping potential customers on your site or driving them away?
- Do you have incentives to get them on your newsletter/email list?
- Is it clear what action steps you want people to take while visiting?
And if any of this overwhelms you? I don’t think I’ve ever met anyone who is perfectly satisfied with their website. The idea is to just take it one small step at a time. What is one area you can improve on?
After a long season of ignoring my website, I usually take a peak in winter and have to laugh at my previous self and whatever the hell I was thinking when I published some of it. And that’s OK, improve and refine. I’ll be working on updating my own website over the next few months with some major redesigns that have my visitor in mind. My ultimately goal is to make things more clear, cohesive, and inviting.

Wrap Up
OK, my friend, that is IT for February. What do you think? Did you find some useful nuggets? Is there anything that’s unclear or you wish I would have covered?
This link will be live until the end of March, at which point you’ll get a PDF copy, so you can always refer back it. Tip: use the find shortcut (Ctrl+F on a PC or Command+F on a Mac to search for any word or term).
Have any questions or something you want to share with me or others? I know I say this ad nauseam, but I truly believe in the power of the collective and that we all have something unique and powerful to share, so please leave a question or share a comment below. We’re all better for it, and I thank you in advance!
Cheers pal!


Hi Maggie, I’m really appreciating how you approach not just gardening, but the personal growth and business side of it all. It’s super interesting and very helpful for someone just getting started with this crazy dream.
I probably missed this, but where do we access the PDF of previous months (January). Is it emailed to us? Thanks!
So glad to hear it, Kaylee 🙂 It all starts with a dream, bravo to you for taking action! You did not miss it! The January links will be live through tomorrow. Once they’re switched to inactive, I’ll email a PDF copy of both articles. I just built in a little extra time for them to be live to make sure everyone was getting what they need (and this will be how all months work . . . so February’s links will be live until end of March, at which point the PDFs for Feb will be sent out).
Thanks for all of your useful information Maggie! I really hope you have luck with overwintering your ranunculus. I’m in zone 5 and would love to try and overwinter them but I’m nervous the voles will eat them all up over winter. Any suggestions to keep little critters out of the hoop house? Also, when do you normally plant your ranunculus after they have sprouted? I was hoping to get my presprouted corms out this weekend but we just got slammed with more snow and I’m scared to put them out now. Thanks again and happy growing!
Thanks for the kind wishes, Lockette, right back at you and your flowers 🙂
Honestly, right or wrong, I *try* not to worry until it’s a problem. So many things can go awry with farming, I do my best to focus on what’s happening now instead of what might happen in the future (sometimes this is easier said than done). With any of these experiments, I try to not get too attached to the outcome. If something works with a reasonable amount of effort, I’ll keep doing it. If the plants die for one reason or another, I’ll count it as a lesson learned (and it wouldn’t be the first time I killed a plant, HA!).
We’ve had something eating a few of our tulip bulbs in the tunnel this spring, so I am watching that closely. As of now, I don’t implement any measures for rodents, so I cannot speak from experience here. We have two dogs and as much as they think they’d love to catch a vole/squirrely/bunny, they never do, but they certainly do try! That said, we’re a lot less active in the field in the winter than we normally are in the summer, but I’ve been taking them down to the tunnel recently (to familiarize the puppy with being around plants and also in the hopes that they deter some critters). If a problem were to get bad, I’d consider installing hardware mesh buried on the sides of the high tunnel, and if it got super bad, I’d bury the wire in the beds to try and deter them from burrowing in but still allow plants to root, if that makes sense. I don’t have experience with this (and I hope not to lol), but it is likely the first steps I would take.
When I plant them out entirely depends on the weather, so I think your thought process is right on track! In the midwest, our springs have wild swings (it can be 80s one day and freezing snow the next). Planting any time can be a gamble here, but ranunculus and anemones are quite tough. They can handle 25F for sure (perhaps even cooler, but much more below this gets us into questionable territory, the limits of which I’m still not sure of myself). If you think are safe from these temps, you should be good (I’m not sure if you’re planting in a tunnel low or high, but an extra tunnel and frost cloth like AG70 would add extra protection).
That said, ranunculus and anemones do surprisingly well growing under lights too, so it doesn’t hurt to let them grow on if you want to hold off (and what I often do). If you don’t think they have enough room, you could pot them up (I like 50-cell trays but I’ve also used 72s). I’d actually like to get ours transplanted into the high tunnel soon (despite the snow), but I’ve just been crazy busy with my day job, ugh. Since we have the high tunnel experiment, I figure I’ll keep watching the weather and plant in the next week or two here ideally.
I hope that helps!!
Cheers,Maggie
Just in case I didn’t answer the “when” I transplant after they’ve sprouted clearly, I’ve transplanted when they are just rooting/sprouting to when they are much larger seedling/plants ( and everywhere inbetween, just weather dependent). I sprout them in 50-cell trays for this reason. If the weather is favorable, they can go out, If not, they can go under grow lights with the rest of the seedlings and grow on as transplants (but they can also be potted up if in a flat and you don’t feel they have enough room). The biggest issue with ranuncs and anemones for me is planting too late because it gets too hot here. They don’t do well when temps are 70s higher.
Thanks so much Maggie for sharing all of your knowledge! I think we will try out the wire mesh in some of the beds. We did that with our tulips this year in our raised beds and so far so good! I feel better about letting our ranunculus grow a little longer under lights and getting them into the high tunnel. Hopefully the majority of the snow will melt within the next two weeks and we can get them out into the sun. Can’t wait to see all of your ranunculus and anemones blooming. Fingers crossed for a cool spring! Thanks again.
Hey, I saw a grower post this on Instagram the other day and I thought of you: It’s called Liquid Defense and it does get a lot of great reviews. The one mentioned was for deer and rabbits (it’s made up of putrescent egg solids and garlic, so I am sure it stinks, HA!) but it sounds like people have had great experience with it and there is also a mole version.
And I’m glad to hear that the wire mesh has worked for you, I may need to keep that one in mind too!! Hoping for a mild cool spring for us all 🙂
Good morning! I’m in the same situation as Lockett Blue! I can’t even open my hoop house door because it’s buried in snow and ice. I began potting up my presprouted ranunculus because they’re already started to grow leaves and I probably have two weeks before getting them in the hoop house.
Is there anything I should be doing to make this stalling work out?
Also, when potting up, should I completely cover or leave any green sprout above soil? I’ve seen it done both ways on you tube….
Thank you! The FFY is a joy 🌸💕
Hi, Kerry! Thank you so much and I am so glad to hear it 🙂 We are buried under snow too, so I can relate, ha. You did exactly what I would do, pot them up! You can grow your ranunculus on like you would your seedlings (if you can get them under some lights, that’s perfect). While we have the experiment going on the tunnel, I also have the ones I sprouted currently in our garage under shop lights. Hope to transplant them in the coming weeks here. Basically, I try and match the natural soil line when transplanting. If they have just a tiny shoot, I bury them. If there is significant foliage, I transplant them like a seedling leaving the foliage above the ground, trying to match where they naturally are above the soil line in the pot/cell. I hope that helps!! I hope we all have the best ranunculus season yet 🙂
Hello, it’s me again! I’m going to be honest and say I’m still working through January tasks as I am a master procrastinator. 🙂 My question is about saving seeds (in their packets) from year to year. Is this frowned upon? I’m scaling back my plans a bit (due to budget and time, which is ok) and well, I was a little over-zealous in my seed buying phase. I still can’t help picking up a pack or two whenever I get go to the local garden store. It’s a real problem.
Now that I am getting do actually planning how many plants I have space for in each of my rows, I will certainly have seeds left over. If I open a seed packet and use seeds from it, can I save them until next year? Or, should I choose which seed packets to save for next year and leave them unopened? Example: I have 12 different sunflower seed packs (like I said, it’s a problem). I’d like to try them all, but if that risks wasting alot of seeds (for the next year), I’ll be responsible and narrow down my selections this year.
Don’t ask how many Zinnia seed packets I have, and Dahlia tubers are a whole other story ;-).
That’s *totally* OK about still working through January! Some tasks get delayed and others simply don’t happen some years. Honestly, farming is like that, at least for me. And I can definitely relate to being overzealous when ordering seeds, HA! And this is an excellent question. Most seeds are fine for one to several year, though not all, and how long depends on the variety and conditions. Coated seed generally doesn’t last as long. Johnny’s has an excellent article on optimum seed storing conditions as well as a breakdown of many varieties. According to them, if stored properly, sunflower seeds can last 3–5 years for example. I don’t think there’s a problem opening different packets, so long as you seal them up again (or better yet, put them in a sealed glass jar in the refrigerator like Johnny’s suggests). For me, personally, this isn’t feasible. My seed “collection” is on an apocalyptic-hoarding level. I use these photo organizers for all my seeds and store the in a cool, dark place. I also will open and re-seal seeds and use them the following year. I *usually* don’t have a problem, but if I know that a seed packet has been around awhile, I may over-sow that variety. Occasionally, I do have sparse germination, so I just order more and start over. Right or wrong, that’s my personal method for the madness, ha, but I would recommend Johnny’s for ideal conditions.
This info is fantastic – Thanks Maggie! Wondering if you have ever grown your ranuncs/anemones in crates before? I don’t think I”ll have my shht together for the low tunnel in the next few weeks and my other option for planting out is raised beds, which got way too hot in May last year even with shade cloth and ice packs. :/ (Remember that?! Ugh, Wisconsin.) Anyway, Wondering if they’ll hate their lives in crates? Of course I’m already pre-sprouting a bunch of butterfly and cloni like the impulsive flower loving gal I am…
Thanks so much Stephanie, from another impulsive flower-loving gal to another! When we were constructing our high tunnel last spring, I did try some in crates without much success, BUT don’t let this discourage you because I believe this was more user error than anything. We were so busy, they were pelted by a storm, and didn’t recover from the excessive rain (rot . . . and YES, I totally remember how hot it was, ugh ). But I believe you can successfully grow in crates! Look at Triple Wren Farm’s success, magical.
Another great resource is this podcast episode with Jennie Love and David Dowling. I know Jennie has said on more than one episode she struggled with it, but he says you can absolutely be successful growing in crates and I do remember he gives recommendations. Had mine not rotted, I would have continued to follow his recommendations. I hope if you do it, yours are a smashing success!!